


Follow our step by step guide of how to create an account to read and send e-mails from your computer. Do you already know how, click the box below for account settings.
Account settings for e-mail
Need more help than that? Follow the guide with pictures below.
Username: your e-mail address
Password: your password
Incoming server: m.work2go.net
IMAP-port: 993
Safety Type / authentication: SSL
Utgoing smtp-server: m.work2go.net
Smtp-port: 465
Safety Type / authentication: SSL
This guide shows you how to add a new account in Outlook 2013.
If you have another version of Outlook, see Add Account in other versions of Outlook at the bottom of the page.
 1. Open the program
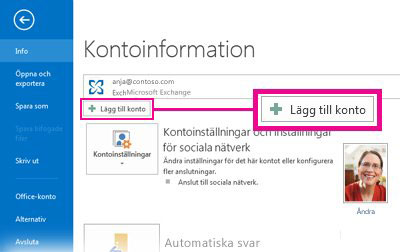
Go to File > Add Account.
Click Configure server settings manually > Next.
Choose Internet E-mail > Next.
Click image for full version.
2. Add your account settings
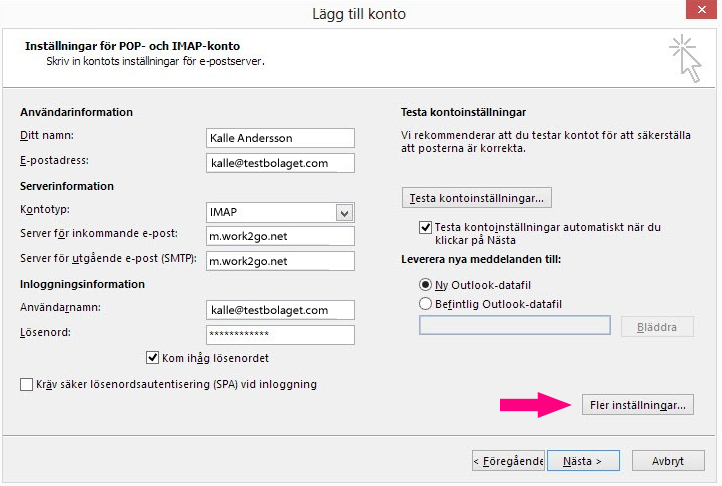 Your name: the name you want to use as the sender.
E-mail address: Your e-mail address.
Account Type: select IMAP.
Server incoming mail: m.work2go.net
Server outgoing e-mail: m.work2go.net
Username: your e–mail address.
Password: your password for your Work2Go account.
NOTE! Requires the Secure Password Authentication (SPA) should NOT be selected!
Click More Settings.
Click image for full version.
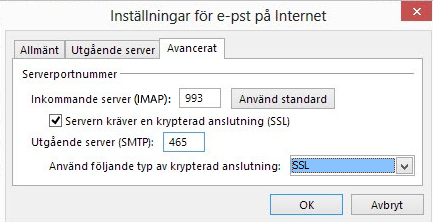
3. Adjust the settings
 Outgoing server – select outgoing server requires authentication.
Advanced – Incoming server (IMAP): 993 and SSL.
Outgoing server (SMTP): 465 and SSL.
Click OK > Next.
Then click Close > Finish.
Click image for full version.
For older versions of Outlook
In older versions there are different ways to reach Step 2 Add your account settings.
Outlook 2010
- Start the program.
- Go to File > Info> Account Settings.
- In the E-mail tab, select New.
- Choose to configure server settings manually.
- Then click Next > Internet E-mail > Next.
- Continue with step 2 Add your account settings.
Outlook 2007
- Start the program.
- Go to Tools > Account Settings.
- Select Microsoft Exchange, POP3, IMAP or HTTP > Next.
- Choose to configure server settings manually > Next.
- Continue with step 2 Add your account settings.
Äldre versioner av Outlook och Outlook Express
- Start the program.
- Go to Tools > E-mail account (Accounts in Outlook Express).
- Select Add a new e-mail account > Next.
- Select server type IMAP.
- Continue with step 2 Add your account settings.
Comments are closed.