


Most of the features are still there, but may have changed places. New look can sometimes complicate things for us. Many of us out there who are creatures of habit and think it’s a bit tough to change. Just because of this we have now put together the following images for you to easily find the right way around in updated Work2Go 8.
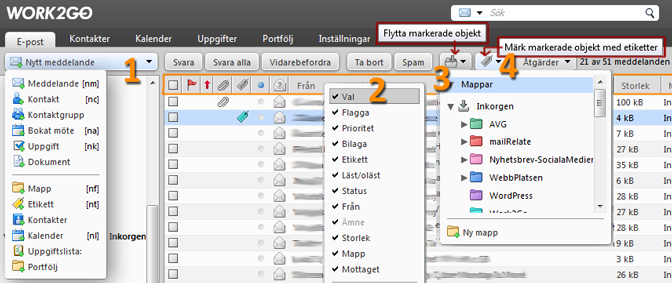
1. Click New message to create a new e-mail message.
Click the arrow to book a new appointment, create a new folder, label etc.
2. Right-click on the orange highlighted field (in the picture) and select the categories you want to be visible with a check mark by clicking on them. To show the bounding box, select “Options”. You can change the order of the different categories by dragging and dropping them.
3. Select the message you want to move to a folder and click the button in the toolbar and then select the appropriate folder.
4. Select a message and click on the tag to select it. The menu that appears also allows you to remove a tag.
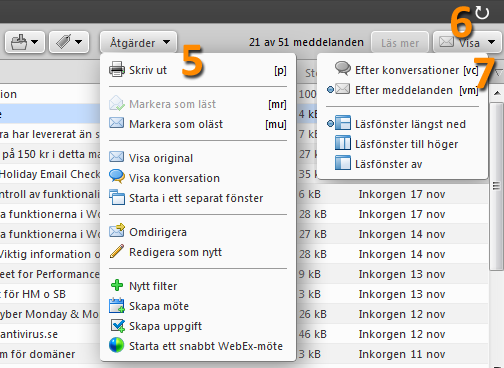
5. Under Actions you will find the functions you can perform, adapted along where in your account you are. For e-mail you can for example print a message, mark it as unread in the list, redirect it to a different e-mail address (ie forward it without leaving any trace of you), edit a received message just as if it was you who wrote it (“Edit as new“) or proceed from a message when you create a new filter or book an appointment.
6. Click the circular arrow if you want to reload and update the page you are on. For example, to update the changes made in the settings, display mode, or to see if it has just entered a new message in an added external account.
7. Under View you will find the different display modes, just like before. The set-up for notifications when you choose to view them by conversation has improved and it is now much more clearly.
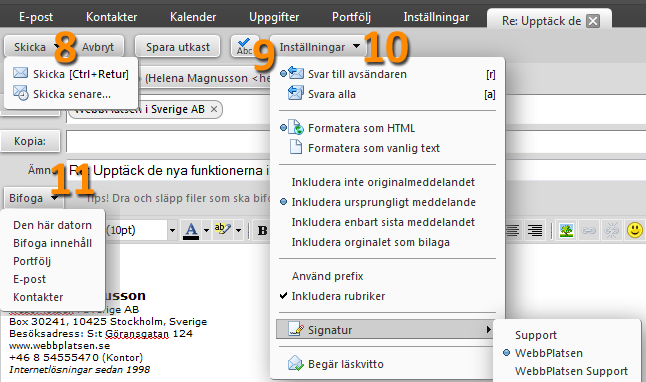
8. Button to send you will find in the top left corner. If you want to schedule and send it at a later time, simply click the arrow and select Send later.
9. Here you will find the button to check spelling.
10. Here you will find the opportunity to add another signature than your default signature. There is also the option to request a read receipt by the recipient and choose whether the message should be written as formatted text (which you can choose the font size, bold, strikethrough text, etc.) or as simple and plain text. When you reply to a message you also get the option to specify how you want the original message to appear in your reply.
11. Attach a file from your computer or briefcase to your message. You can also attach selected contacts’ contact cards and other e-mails from your inbox.
Right-click or drag-and-drop
Most of the functions are also available by right-clicking or by selecting and then drag and drop.
Comments are closed.