


It is possible to cancel a misprint when one has just performed an action such as delete or move a contact. Just click on Undo at the top of the page.
Work2Go är uppgraderat och finns nu på WebbPlatsen Office
It is possible to cancel a misprint when one has just performed an action such as delete or move a contact. Just click on Undo at the top of the page.
With a contact group, it is enough to write the name of the group when sending a message to all members. Just like a distribution list, even though you don’t need to have administrator rights to create it.
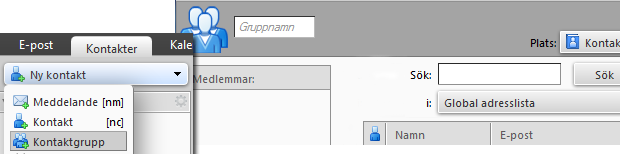
NOTE! E–mail addresses that are added to a contact group will only be saved in your contact group, not as a separate contact in any address book. A contact group is simply a list of addresses.
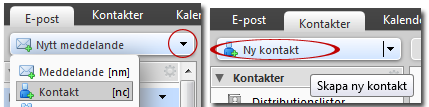
Do you already have a lot of contacts in an address book and want to avoid searching for them?
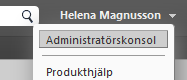 Log in to the admin account. It’s usually admin@yourdomain.com but not always. If you are not sure which account is your administrator account you just contact our support. It is only on an administrator account you see Admin console under your name.
1. Log in to the admin account.
All have at least one administrator account and usually it’s e-mail address admin@yourdomain.com
2. Click the arrow next to the account name in the top right corner to select the Admin Console and log into the admin interface (same login as your account, you are already logged in).
3. Click Manage in the left column and then Distribution lists.
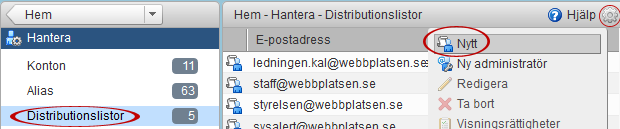
4. At the top right, click the gear > New.
5. Fill in a name / e-mail address, for example staff@yourdomain.com if you want to create a mailing list to easily send e-mails to everyone in the company (those included in the list).
6. Add e-mail addresses to the list.
Either by searching for their name in the top right corner or by entering their e-mail address in the box below. Click Add / Add All> Next.
7. Click Finish.
 When sharing an Address Book, a copy of the original is placed in the other user’s left column and therefor one will not need to log in to the other person’s account to access the contact in the Address Book.
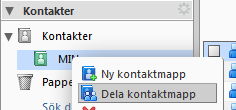
1. Right-click address book > Share Address Book.
2. Choose who you want to share the Address Book with:
Internal users or groups
The user or group must have a valid email address in Work2Go. Assign them one of the following roles:
External guests
They can only read the content of the Address Book, not make any changes. Just enter their email addresses and provide them with a password to view the content.
Public
They can only read the content of the Address Book and don’t need a password for it. Hand out the URL that appears in the box below. Right-click it and select ”Copy link” to get hold of the full URL. Anyone who knows about the URL to this folder will be able to see its content. No one can however make any changes to it.
3. In the Message area, select the type of message you want to send out to those you want to share your Address Book with.
4. Click OK when you’re done.
If you want to collect addresses of all of the company to have access to, we recommend that you create it on your admin account. Since you share the address book to everyone. If the shared address book would be available on an employee’s account at a later time stops, there is a risk that your shared address book deleted when their account is deleted.
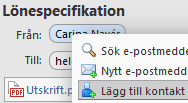 Right-click the sender of the message> Add contact.
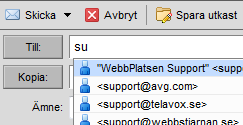 When creating a new message and filling in the recipient’s e-mail address it is enough to only type in the first letters of the address. Work2Go automatically displays a list of names from your Address Book that matches the letters you typed. From there you can go ahead and select the correct one from the list.
GAL is the Global Address List and is available to all users within your organization/domain. This list is created automatically and can not be edited. It includes all users’ email addresses within your domain.
You can do the same with Contact Groups.