


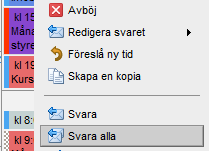
 If you want to send a message to everyone who has been invited to a meeting, right-click the meeting in the Calendar > Reply to all.
A blank e–mail message with everyone’s e-mail addresses will open ready to send when you are finished.
Work2Go är uppgraderat och finns nu på WebbPlatsen Office
If you want to send a message to everyone who has been invited to a meeting, right-click the meeting in the Calendar > Reply to all.
A blank e–mail message with everyone’s e-mail addresses will open ready to send when you are finished.
If someone outside your office wants to schedule a meeting with you and want to get suggestions on when it can suit you, you can create a link from your calendar and send it to the person.
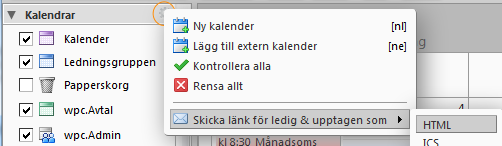
 Click the gear to the right of the title calendars.
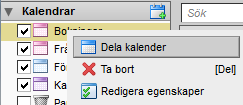
Share your Calendar is useful when you want others to know your schedule. When sharing a Calendar, a copy of the original is placed in the other user’s left column and therefor one will not need to log in to the other person’s account to view it’s content.
1. Right-click the calendar > Share this calendar.
2. The “Partition Properties” opens.
3. Select with who you want to share the calendar:
Internal users or groups
The user or group must have a valid email address in Work2Go. Assign them one of the following roles:
External guests
They can only read the content of the Calendar, but can’t make any changes to it. Enter the email address of your guest and set a password.
Public
They can only read the content of the Calendar and don’t need a password for it. Hand out the URL that appears in the box below. Right-click it and select ”Copy link” to get hold of the full URL. Anyone who knows about the URL to this Calendar will be able to see its content. No one can however make any changes to it.
4. To allow users to view your private appointments, tick the box.
5. Select the type of message to be sent out to those you want to share your folder.
6. When you are finished click OK.
NOTE: Keep in mind that if you have chosen Public, you will need to notify about the URL.
When you receive a meeting invitation, the meeting is automatically added to your Calendar and you confirm whether you can attend or not in the email sent to you. You can also confirm an invitation by right-clicking the meeting in your Calendar.
NOTE! If you want to keep the invitation in your inbox, you can change the setting in the Preferences tab> Calendar: General. There, uncheck the box in response to the invitation: Remove the invitation of replies.
If you want to undo your answer or want to change a setting (eg in which calendar the meeting should be saved in), you can right-click the meeting in your calendar and change. The meeting is visible in your calendar even though you chose to decline. This is because you will have the opportunity to change your mind. If you do not want declined meetings to appear in the calendar, you can change this. Go to the Preferences tab > Calendar > General: Here in the top box, you can uncheck the box next to Show declined meetings.
When you receive an invitation with an attached .ics file, click Add in calendar at the top of the message to save the invitation in your calendar. Select the calendar in which the invitation should be saved to.
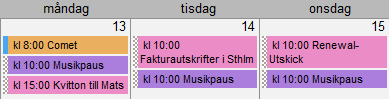
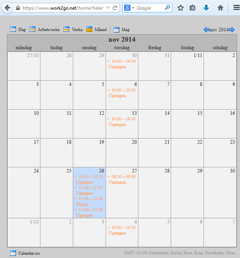
Figure 1: Your calendar shows you all the information you have added as private posts (purple).
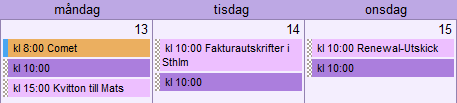
Figure 2: Your colleague’s calendar shows only the time that you have added to your Calendar (purple).
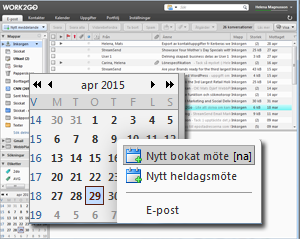 An easy way to book a meeting is to right-click on a date in the mini calendar in the bottom left corner and choose that you want to book a meeting.
Then you get the option to add the most essential for the meeting. If you want to fill in more details, just click More Information.
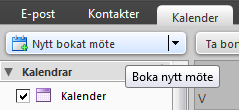 Click New booked meeting.
In this example, we go through the steps you are taking when you click New Booked meeting in the toolbar on the Calendar tab. A new appointment opens, ready to be filled in.

From: choose who to send the meeting invitations from.
Subject: write a short description of the meeting.
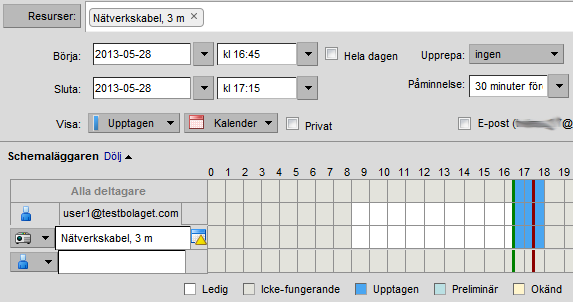
Now you can start using the tool scheduler to get help to see when the participants and registered places are available. The availability is displayed in time blocks of 30 minutes in the overview window to the right. You can of course fill in the information on your own; participants, location and the start and end time for the meeting as well. Is it an all-day meeting, check the box during the whole day.
Optional atendees: participant you might want to invite to the meeting, but whose participation is voluntary.
Location: location for meeting.
Equipment: book equipment needed for the meeting.
NOTE! Optional and equipment is not displayed by default. To obtain these choices, click Show optional or display equipment.
 The tool will help you to find a convenient time to schedule an appointment. When you add participants to the meeting, you can in the overview window view their availability in 30 minute blocks.
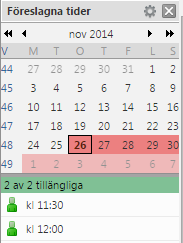
To select a suggested time, click on the row. Start and end time is updated in the reservation. The number to the right of the period is the number of places available for the moment. You can click on the numbers to see a list of suggested places available to choose from. The selected location is added to the Location field in the scheduler. To select a location, click on the number in line with the proposed time. Choose a place in the list that appears. The location is added to the Location field in the meetin invitation.
NOTE! Locations are shown only if they have been registered in your Administrator account.

Show: choose the calendar status the participants will have when they are scheduled for the meeting.
Calendar: select which calendar the meeting should be saved to.
Private: detailed information of the meeting is not displayed if it is marked as private. In contrast, it displays information such as its start and end time, if it is a recurring event and who have booked the meeting.
Repeat select when it’s a recurring meeting. You can also go to Custom and fill in additional information about the time if desired.
Reminder select when the participants will get a reminder of the meeting.
If you want to be reminded of an appointment to another e-mail address, you can add it by clicking Configure.
Attachment can be addedahead if you click the clip at the top toolbar and then click Browse above where you fill in a message.
In the bottom box fill in the text you want to send along with your meeting invitation.