


You can book meetings in various ways. Here we tell you about the various options and step by step instructions of how to create one, including useful options to use.
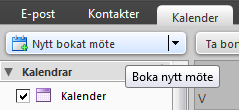 Click New booked meeting.
- Hold the N key.
- Right-click on a date in the mini–calendar.
- Drag and drop e-mails to the mini the Calendar.
- Create a copy of an existing meeting by right-clicking the meeting > Create a copy.
In this example, we go through the steps you are taking when you click New Booked meeting in the toolbar on the Calendar tab. A new appointment opens, ready to be filled in.

From: choose who to send the meeting invitations from.
Subject: write a short description of the meeting.
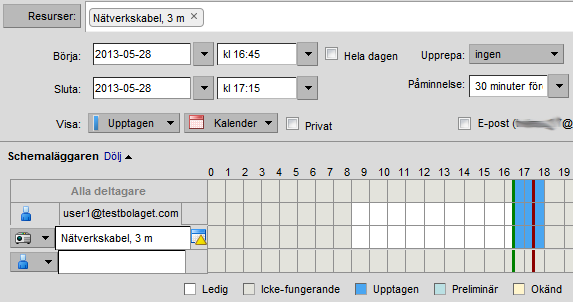
Now you can start using the tool scheduler to get help to see when the participants and registered places are available. The availability is displayed in time blocks of 30 minutes in the overview window to the right. You can of course fill in the information on your own; participants, location and the start and end time for the meeting as well. Is it an all-day meeting, check the box during the whole day.
Optional atendees: participant you might want to invite to the meeting, but whose participation is voluntary.
Location: location for meeting.
Equipment: book equipment needed for the meeting.
NOTE! Optional and equipment is not displayed by default. To obtain these choices, click Show optional or display equipment.
Show the Content
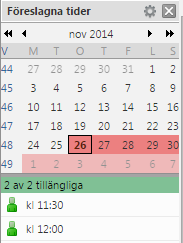 The tool will help you to find a convenient time to schedule an appointment. When you add participants to the meeting, you can in the overview window view their availability in 30 minute blocks.
- Green means that all participants and at least one location is available for these days.
- Red means that more than half of the participants can not attend the meeting on those days.
To select a suggested time, click on the row. Start and end time is updated in the reservation. The number to the right of the period is the number of places available for the moment. You can click on the numbers to see a list of suggested places available to choose from. The selected location is added to the Location field in the scheduler. To select a location, click on the number in line with the proposed time. Choose a place in the list that appears. The location is added to the Location field in the meetin invitation.
NOTE! Locations are shown only if they have been registered in your Administrator account.
Show the Content
- To reserve a room you use the button Location to find a room for your meeting.
If you don’t know which rooms are registered in order to be booked, just click on the Search button without entering any search criteria and you will get a list of all the registered rooms.
- Book equipment is done by clicking the button Equipment. Don’t you see the button, click the text display equipment right of the Location field. If you don’t know what equipment you can book, click Find without entering any search criteria and you will get a list of all the equipments that are registered.
- If the room or the equipment is already fully booked the selected time, it’s easy to see this in the list. You can see for how long the room / equipment is booked in the utility Scheduler.
- When you click Send a confirmation message is sent to the person who organized the meeting and invitations to the invited persons. Since all bookings are accepted automatically if the resource is idle or is refused if it is already booked, you don’t need to log into any account to accept anything.

Show: choose the calendar status the participants will have when they are scheduled for the meeting.
Calendar: select which calendar the meeting should be saved to.
Private: detailed information of the meeting is not displayed if it is marked as private. In contrast, it displays information such as its start and end time, if it is a recurring event and who have booked the meeting.
Repeat select when it’s a recurring meeting. You can also go to Custom and fill in additional information about the time if desired.
Reminder select when the participants will get a reminder of the meeting.
If you want to be reminded of an appointment to another e-mail address, you can add it by clicking Configure.
Attachment can be addedahead if you click the clip at the top toolbar and then click Browse above where you fill in a message.
In the bottom box fill in the text you want to send along with your meeting invitation.
Click send in the top left corner
- The invitation is now sent to the invited participants. If you invite yourself to the meeting, you will not receive an invitation but it will be saved in your calendar right away.
- Save Click to send the invitation at a later date. This saves a local copy of the meeting, invitations will not be sent to the participants.
- If you add an appointment to a shared calendar, you may need to refresh your browser to see the meeting in the calendar.
Comments are closed.