Archive | Support EN

Setting up account in MS Mail app [Pro]

Select Exchange ActiveSync

Go to Email and app accounts

Add an account (1)
Select Advanced configuration (2)
Continue (3)


In the next popup, enter:

Your email address (username)
Your password
Your email address (username) again
Domain (everything after @ in your email address)
Server: m.work2go.net
As well as naming your account
Then click on Log in. Done!

Sync contacts on Mac

Follow the steps below to sync your contacts from Work2Go to the Contacts app on your Mac.

1. Open the Contacts app.

2. Click on Contacts at the top left and select Add Account…


3. Select Other Contacts Account…


4. Fill in the information below.
Account Type: Manual
Username: Enter your email address
Password: Enter password
Server address: m.work2go.net


5. Click Sign in > Done.

All contacts are now syncing, this will take a few minutes.

Sync Calendar on Mac

Follow the steps below to sync your calendar from Work2Go to the Contacts app on your Mac.

1. Open the Calendar app.

2. Click on Contacts at the top left and select Add Account…

3. Select Other CalDAV Account…


4. Fill in the information below.
Account Type: Manual
Username: Enter your email address
Password: Enter password


5. Click Sign in > Done.

The calendar is now synchronizing, this will take a few minutes.

Add an e-mail account to iPhone

This guide shows you how to add an account for reading and sending e-mails in an iPhone. Do you already know how to do this? Click on the box below for the account settings.

1. Create the account

Settings > E-mail > Accounts > Add account > Other > Add e-mail account.

2. Add your account settings

  1. Enter a name of your choice
  2. Address: your e-mail address.
  3. Password: your password.
  4. Description: Give the account a description
  5. Tap Next.

Click image for full version.

3. Fill in the settings

  • Write your name
  • Email = your entire email address
  • Description: Give the account a name of your choice
  • Hostname: m.work2go.net
  • Email = your entire email address
  • Password: your password (same as in the browser)
  • Hostname: m.work2go.net
  • Email = your entire email address
  • Password: your password (same as in the browser)


NOTE! Fill in both the e-mail address and password here, regardless of whether it says Voluntary!

Tap Next and your settings are verified and once it’s done, you tap Save.

Click image for full version.

4. Select what you want to see in your phone

Now you can choose what you want to see in your phone

  • E-mail
  • Notes

Click image for full version.

Click finish to Save.

If it doesn’t work properly

Test your e-mail address and password on www.work2go.net and check all the settings in your phone again. Read more in Can not send or receive e-mails

Add an e-mail account to Android

This guide shows you how to add an account for reading and sending e-mails in an Android. Do you already know how to do this? Click on the box below for the account settings.

JellyBean11. Create the account

  1. Click Menu > Account > Menu > Add account.
  2. Fill in your e-mail address och password to your account.
  3. Click Manual setup.

Click image for full version.

JellyBean2-IMAP2. Select the account type IMAP

We recommend using IMAP since your messages will be kept on the server, and you can also read your mail when logging in to your account at www.work2go.net

Click image for full version.

JellyBean3-IMAP3. Add your account settings

  1. Fill in e-mail address and password.
  2. Incoming server: m.work2go.net
  3. Select Security Type SSL and Server port 993
  4. Click Next.

Click image for full version.

4. Adjust the settings

JellyBean4-IMAPEnter account settings for outgoing server.

  1. SMTP server: m.work2go.net
  2. Port: 465
  3. Security Type: SSL
  4. Choose Requires sign-in
  5. Fill in e-mail address and password.
  6. Click Next.

Click image for full version.

JellyBean5-IMAP5. Choose how you want to receive your e-mails

Select appropriate settings for your e-mails.
Click Next to give the account a name and how you want your name to appear when you send e-mails from your mobile.

Click image for full version.

If it doesn’t work

Test your e-mail address and password on www.work2go.net and check all the settings on your phone again. Read more in Can not send or receive e-mails

Can’t send or receive e-mails in iPhone

Got an error message when setting up an IMAP account in your iPhone? Then you need to check the settings.

1. Are you using the correct username and password?

Test your e-mail address and password by signing on to: work2go.net

2. Control all settings in your mobile

Go to Preferences > E-mail, Contacts, Calendar > Your account > Account information.

  1. Address: your e-mail address
  2. Host name: m.work2go.net
  3. Username: same e-mail address as you just tried in a web browser.
  4. Password: fill in your password once again.
  5. SMTP: m.work2go.net
  6. Click SMTP > m.work2go.net
  7. Host name: m.work2go.net
  8. Username: same e-mail address as you just tried in a web browser.
  9. Password: fill in your password once again.
  10. Use SSL
  11. Authentication: password
  12. Server port: 465 (or 587)
  13. Finish > Account information
  14. Click Advanced.
  15. Scroll down to Settings for incoming.
  16. Use SSL
  17. Authentication: password
  18. Server port: 993
  19. Finish

Can’t send or receive e-mails in Android

Got an error message when setting up an IMAP account in your Android? Then you need to check the settings.

1. Are you using the correct e-mail address and password?

Test your username and password by signing in on: https://www.work2go.net/

2. Control all settings in your mobile

Go to Preferences > Your account > Server settings > Incoming server settings.

  1. Android-4.1Username: your e-mail address
  2. Password: your password
  3. IMAP-server: m.work2go.net
  4. Port: 993
  5. Security Type: SSL

Click image for full version.

  1. Android-4.1-2SMTP-server: m.work2go.net
  2. Port: 465
  3. Security Type: SSL
  4. Require logon must be selected
  5. Username: your e-mail address
  6. Password: your password

Click image for full version.

Change your signature in Android

Here we show you how to add a new signature for e-mails sent from your mobile.

1_inst

1. Open settings

Go into your e-mail app > click Menu button to access your settings for e-mail (usually found at the bottom of the screen) > Preferences. Click on the account you want to make changes to.

Click image for full version.

3.1.e-post_3.1

2. Change the signature

Now you see the selected account’s general settings.
Click Signature to enter your own.

Click image for full version.

Change signature in iPhone

Here we show you how to write a new signature that appears when you send e-mail from your mobile.

  1. Go to Settings> Email.
  2. Scroll down the screen to the Signature heading.
  3. Here you can enter different signatures for the e-mail accounts you have.

Click image for full version.

Add e-mail, contacts and calendar in Android [PRO]

This guide shows you how to add an account to manage e-mail, contacts and calendar on an Android.

This requires Work2Go Pro

If you don’t have Pro today, you can upgrade by contacting our support.
Not interested of upgrading? Follow the guide, Add e-mail account in…instead.

jellyBean-1SYNC1. Create the account

  1. Click Settings > Accounts & sync > Add account.
  2. Fill in your e-mail address and password.
  3. Then click Manually.

Click image for full version.

jellyBean-2SYNC2. Select the account type Exchange

Exchange ActiveSync is a technology that was developed by Microsoft and used to send information between devices, such as Work2Go Pro server and your mobile.

Click image for full version.

3. Add your account settings

jellyBean-3SYNCEnter your email address and password.

  1. Server: m.work2go.net
  2. Use SSL and Port 443.
  3. Click Next.
  4. Fill in an account name.

Click image for full version.

If it doesn’t work

  • Test your email address and password on www.work2go.net/.
  • Check all the settings in your phone again.
  • Are you unsure if you have Work2Go Pro or not? Contact our support.

Add a shared calendar in iPhone

Do you have a shared calendar at work?
Would you like to be able to access it in your mobile?
  1. Find out the log in details to the account where the calendar is distributed from.
  2. Add a new account in your mobile with the account type Exchange.
  3. Select to only sync calendar.
This requires Work2Go Pro Unless your account and the shared calendar has been created in Work2Go Pro today, you can upgrade them by contacting our support.

Options for you without Work2Go Pro

Show the Content

If you want to view a calendar that someone else created and distributed to you, you should subscribe to it. You can see the content, but not add any new information to it. You will receive reminder alarm in your mobile phone from the calendar if this is enabled.

prenumerera_kalender1
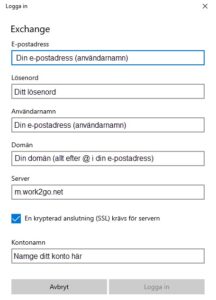
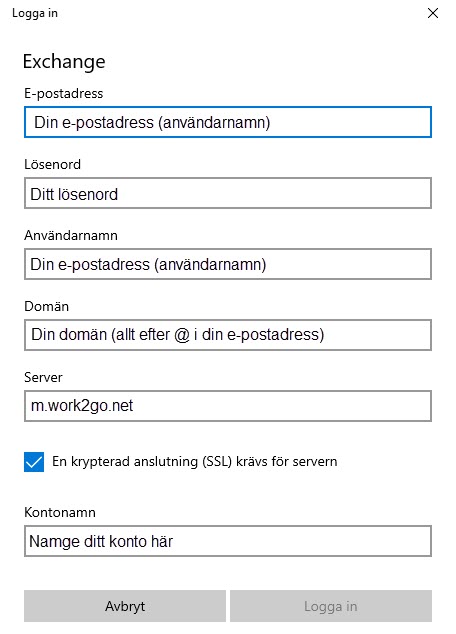
1. Log on to Work2Go

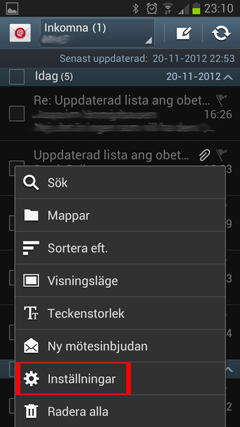
This is how you download the link to the calendar. NOTE! If it’s not your calendar, you will need to ask the person who owns the calendar to give you the link. Right-click Calendar > Edit Properties > Add sharing.

prenumerera_kalender2

2. Right-click on the link at the bottom, ICS

Choose Copy Link Location > and paste into a message and send it to yourself so you can easily access the link into your iPhone later.
Examples of link: https://www.work2go.net/home/email@yourdomain.com/Shared

pren_calendar_iOS7

3. Open your message in your iPhone and copy the link

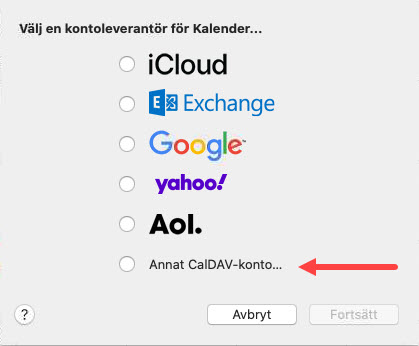
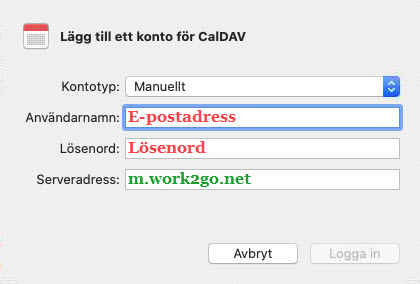
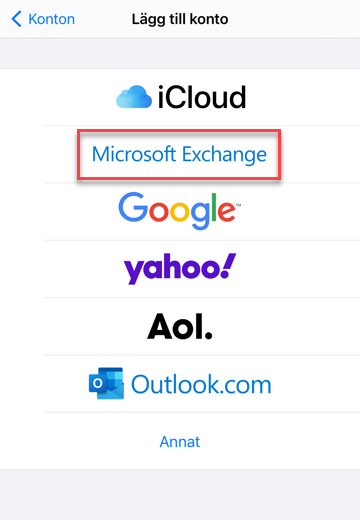
Go to Settings > Mail, Contacts, Calendars > Add Account > Other > Add Subscribed Calendar > paste the link by the Server > Next.
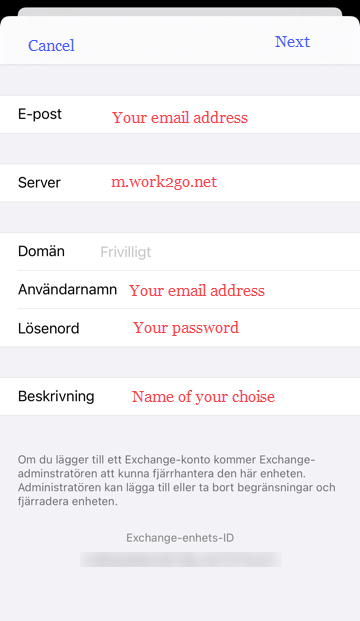
Your settings verifies and you get a notification saying that the account requires a username and password > OK.
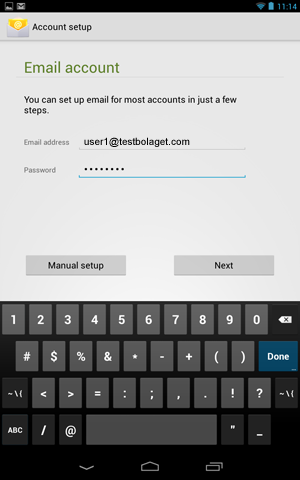
Fill in the account’s e-mail address and password > Next > OK > Save > Save.

Add a shared calendar in Android [PRO]

Do you have a shared business calendar that you would like to have access to on your mobile? Here we tell you how.

This requires Work2Go Pro

If you don’t have Pro today, you can upgrade by contacting our support.
  1. Find out the login details to the account where the original calendar is kept.
  2. Add a new account in your mobile with the account type Exchange.
  3. Select to only sync the calendar from this account.

Save deleted messages on the server

When sending or deleting messages in your mobile they are not saved on the mail server but on the phone.

  1. Settings> Passwords and accounts> select your account.
  2. Click on your email address at the top> Advanced Settings.
  3. Here you can choose what should happen to Rejected Emails:
    Mailbox Deleted or Mailbox Archive

Click image for full version.

Which folders to sync with your Android? [PRO]

Learn how you can select which folders you want to access from your mobile. If you don’t need to have access to them all it’s unnecessary to synchronize them. This saves your battery consumption.

This requires Work2Go Pro

If you don’t have Pro today, you can upgrade by contacting our support.

1.mapp

  1. Go to Applications > Mail. Now you see your inbox.
  2. Click the Menu button to access your settings for e-mail (it is usually found at the bottom of the screen).
  3. Select Folders from the menu that appears, select the folders you want to sync. By default only the Inbox is selected.

Click image for full version.


Add account in iPhone [PRO]

This guide shows you how to add an account to manage your e-mail, contacts and calendar on an iPhone.

This requires Work2Go Pro

If you don’t have Pro today, you can upgrade by contacting our support.
Not interested of upgrading? Follow the guide, Add e-mail account in… instead.

1. Create the account

Go to Settings> Email> Accounts> Add Account> Microsoft Exchange.

Click image for full version.

2. Enter email address and name the account

  1. Fill in your entire email address
  2. An optional description of the account.
  3. Click Next and then Login.

Click image for full version.

3. Fill in the settings

  1. Email = your entire email address.
  2. Server: m.work2go.net (You can skip Domain).
  3. Username = your entire email address.
  4. Password: your password (same as in the browser) and click Next.

Click image for full version.

4. Choose what to sync with your mobile

If you have several folders, calendars etc. on your Work2Go account, you can sync them all to your iPhone / iPad if you want. As long as you are the owner of the calendar, you do not need to set up an extra account for it.
Then finish with Save.

Click image for full version.

If it doesn’t work

  • Test your e-mail address and password on work2go.net.
  • Check all the settings in your phone again.
  • Are you unsure if you have Work2Go Pro or not? Contact our support.

Add to meetings/contacts correct on the account [PRO]

In order for new meetings and contacts that you add to your mobile to be added to your calendar / address book in Work2Go, you need to set it in the mobile’s settings. Here you see how.

Set default calendar

  1. Go to Settings> Calendar.
  2. SScroll down the screen to the Default Calendar heading.
  3. Choose your Work2Go calendar here.

Click image for full version.

Set default address book

  1. Go to Settings> Contacts.
  2. SClick Default Account.
  3. Select Address Book Exchange.

Click image for full version.


How often should your Android retrieve new information? [PRO]

You can set how often you want your phone to retrieve new information from your account, such as how often it should check with the server if you have a new e-mail message.

A mobile that collects e-mails every fifteen minutes consumes less battery power than the one that retrieves e-mails every minute.

This requires Work2Go Pro

If you don’t have Pro today, you can upgrade by contacting our support.
1_inst

1. Go to settings

Go to the e-mail client available under Applications > Mail. Now you see your inbox. Click the Menu button to access your settings for e-mail (it is usually found at the bottom of the screen) > select Settings > your account.

Click image for full version.

3.2syncschema2. Change the sync schedule

Scroll down to the heading Exchange ActiveSync settings > Select Sync Schedule. Set how often your phone will sync your information.

Click image for full version.


How often should your iPhone retrieve new information? [PRO]

You can set how often you want your mobile to retrieve new information from your account, such as how often it should see if you have received a new email.

A mobile that retrieves information every quarter saves on its battery compared to the one that retrieves new information every minute.

This requires Work2Go Pro

If you don’t have Pro today, you can upgrade by contacting our support.

  1. Settings> Email> Accounts> Retrieve new data.
  2. Here you now set how often your mobile should sync information.

Click image for full version.