If your company has registered your meetingrooms and equipment in your administrator account, you can search for them and book them from your calendar.
Fill in what you are looking for in the search box at the top of the toolbar.
If you are unsure what the resource has the name, you can search for it by starting to book a new appointment and then search for the resource.
When searching from the Calendar tab, Booked meetings is already chosen,
if not, select it in the menu on the search box.
Show calendar as a list of the best overview of the search results.
Click the arrow next to View in the toolbar and choose List from the menu.
Set the time interval of the results.
The results list below updates automatically.
To be able to book a room or equipment while creating a meeting invitation, they must have been registered in Work2Go first. Here we explain how.
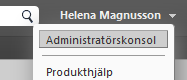
Registration can only be made by the person / persons who have an account with administrative rights. Click the arrow next to your name in the upper right corner. You have administrative rights if you see the Administrator Console in the menu list.
1. Log on to the Administrator account.
All have at least one administrator account and usually it’s e-mail address admin@yourdomain.com
2. Click the arrow next to the account name in the top right corner to select the Admin Console and log into the admin interface (same login as to your account, the one you are already logged in).
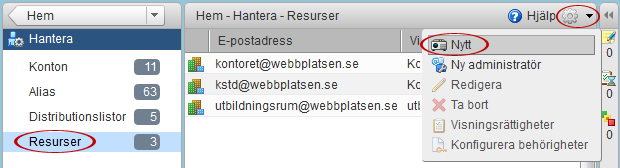
3. Click Manage in the left column and then Resources.
4. Top right click the gear > New.
Name: the display name that is visible when you should book the resource.
E-mail: if there is a projector, you can eg write projektor@dindomän.se
Type: select whether it is a place or equipment.
Scheduling Policy: select the tour rule that fits best.
We recommend using Auto-accept if possible, the deflection automatically conflict. When selected, approved reservation request automatically if the requested resource is available. If it is already booked deflected inquiry.
It is a good idea to allow a number of conflicts in a reservation if you eg booking recurring meetings.
Forward calendar invitations: fill in to whom / which email / s booking inquiries should be sent.
Description: Fill possibly a description of the resource.
Click Next and enter any of the contact information for the person responsible for the reservation of rooms and equipment, if the person making the reservation need to contact someone.
Fill out any more information about the room as a place recorded, such as how big the room is, which floor or building it is in.
When the resources registered in the admin interface, you can choose from a range of different reservation policy. We usually recommend Accept automatically if possible, the deflection automatically conflict.
Automatically accept if possible, the deflection automatically conflict
When this rule is enabled, approved all reservations automatically if the resource is free and deflected if it is already fully booked. With this rule, it is possible to see the times at which the resource’s free / busy.
When this rule is selected Recorded deflected all requests automatically. All requests for an available resource preliminary reservation and must be approved manually. If you want to use this rule, we recommend you to forward a copy of the booking message to the account that you log on to manually accept the booking.
Always accept automatically
All resource reservations are accepted automatically, whether it is free or already booked up. An example of the use of this rule may be if you are often booking appointments in a public place that does not need to be booked first, but you want to get the site’s address and contact information in your invitation in a simple way.
When the rule deflector is automatically used, you can also add exceptions. That is to say that it is possible to book the resource even though it is already fully booked.
Upon registration of the resource is determined how many times or the percentage of those conflicts to be let through.
This is useful if you have recurring appointments or meetings that extend over a longer period. So that it is possible to reserve the resource during the time when it has not been double-booked already.
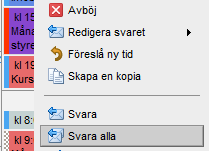
If youwant tosend a message toeveryone whohas been invitedto a meeting, right-click the meetingin the Calendar >Reply to all. Ablank e–mail message with everyone’se-mail addresseswill openreadytosendwhen you are finished.
Howto shareyour calendar with otherswho do not havean accountinWork2Go.
If someoneoutside your officewants toschedule a meetingwith youand want to getsuggestions onwhen itcan suit you,you can createa link fromyour calendarand send it tothe person.
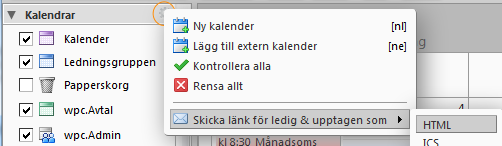
Clickthe gearto the right ofthe titlecalendars.
SelectSubmit linkforfreeandbusy as> HTML. The linkis placedin the message thatyou writeclearly andsend.
The recipientclicks the linkin your message, and your calendaris openedin a browser.Nowthe receiver canscrollback and forthand seeat what timesyou’realready busy. Itdoes not showwhat youhave writteninyour calendar, only the textBusy(see picture).
Information about thedifferentsettings thatyoucan do for yourcalendar onyour account.
At Preferences > Calendar you decide how you want your Calendar to appear and how activities should be managed.
General
Select the default view of your Calendar: monthly, weekly, daily, as a list or schedule.
Set which day your week should start with.
Decide if your appointments should be set as public or private by default. (You can always modify this when creating a new Calendar.) When you receive Calendar invitations, they are marked as public if you have chosen public here. When private is selected, invitations will be marked as private instead.
Choose if you want your mini Calendar to be visible or not.
Decide if the week number should be visible.
Choose whether received invitations should be added to your Calendar automatically. If this option is selected, you can accept invitations from both e-mails and from your Calendar. If you haven’t selected this option you can only accept invitations by e-mail.
Enable if you want to delegate your Calendar for an Apple iCal CalDAV client.
Select whether e-mailed invitations should be removed when you have answered it.
Forward invitation e-mails to another email address.
How and when reminders for appointments should be displayed.
Work week andhours
Set how your work usually looks like to simplify meeting bookings.
Creating Appointments
Use the QuickAdd dialogue when creating new appointments. This is very useful if you create a lot of appointments that only include yourself.
Show timezone list in appointment view, which makes it more clear for you when you schedule meetings with people in different time zones.
Permissions
You canonlymake settings forpersons ofthe same organization(using the samedomain in thee-mail address) as you. You can usethefull email addressor justthe username of the/thoseyou want to specifypermissions.
Set whether users should be allowed to see your free / busy time.
Specify who can invite you to meetings, all or certain users.
If you limit who can invite you, you can also choose to send an automatic reply message to let them know that they do not have permission to invite you.
Apple iCal
Enable to be able to see a calendar in Apple iCal.
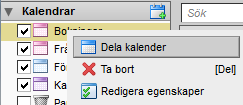
Shareyour Calendaris usefulwhen youwant others toknowyour schedule.When sharing a Calendar, a copy of the original is placed in the other user’s left column and therefor one will not need to log in to the other person’s account to view it’s content.
1.Right-clickthe calendar > Share thiscalendar. 2.The “Partition Properties”opens. 3. Select with whoyou wantto share the calendar:
Internal users or groups The user or group must have a valid email address in Work2Go. Assign them one of the following roles:
None: An option you use to temporarily disable access to a shared Calendar without canceling the sharing. The Calendar will still remain in the other person’s account, but they won’t be able to view its content.
Viewer: can read the content, but can’t make any changes to it.
Manager: has full permission to read and edit the content.
Admin: has full permissions to read, edit, add, delete, accept or decline invitations and administrate its content.
External guests
They can only read the content of the Calendar, but can’t make any changes to it. Enter the email address of your guest and set a password.
Public
They can only read the content of the Calendar and don’t need a password for it. Hand out the URL that appears in the box below. Right-click it and select ”Copy link” to get hold of the full URL. Anyone who knows about the URL to this Calendar will be able to see its content. No one can however make any changes to it.
4. Toallow usersto view your privateappointments, tick thebox. 5.Select the type ofmessage to be sentout to thoseyou want to shareyourfolder. 6.When you are finished click OK.
NOTE: Keep in mind that if you have chosen Public, you will need to notify about the URL.
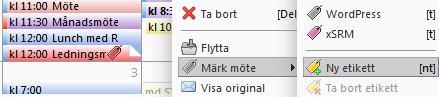
With the help oftags, you cancategorize yourcalendarentriesandappointments. This maybe useful ifyou are working ondifferentprojects at onceandeasilywant todistinguishthemin the calendar.
Create calendarpost.
Right-click theentryin the calendar > Markingmeeting > New tag or selectan already createdtag.
Learn whatyou can do whensomeone invites youto a meeting.
When you receive a meeting invitation, the meeting is automatically added to your Calendar and you confirm whether you can attend or not in the email sent to you. You can also confirm an invitation by right-clicking the meeting in your Calendar.
Choose Accept, Decline or Tentative – which means you’re not yet sure if you’re able to participate.
When you’re confirming you can also decide if you want to send a notification email and you can also add your own message to it, by clicking the arrow next to the options.
You can also save the meeting in another Calendar if you want. Select the correct Calendar in the top-right corner of the email.
If the meeting is a recurring meeting, you can also choose whether to confirm each occurrence or for the entire series.
Once you’ve confirmed, the invitation email is automatically added to your Trash.
NOTE: If you want to keep the invitation in your inbox, you can change this at Preferences > Calendar: General and untick the box for After responding to an invitation: Delete invite on reply.
NOTE! If youwant to keep theinvitation inyour inbox, you can changethesettinginthe Preferences tab> Calendar: General. There,uncheck the boxinresponseto the invitation: Removethe invitationof replies.
Changeyour answer oranother changes
If youwant to undoyour answeror wantto change a setting(eg inwhich calendar themeetingshould be saved in), you can right-click the meetinginyour calendarand change.The meeting isvisible inyour calendareventhough youchoseto decline. This is because youwill have the opportunityto change your mind. Ifyou do not wantdeclinedmeetingstoappear in thecalendar, you canchange this.Go tothe Preferences tab > Calendar > General:Herein the top box, you can uncheck thebox next toShowdeclinedmeetings.
Confirm anappointmentfrom a non-Work2Go calendar
Whenyou receive an invitationwith an attached.ics file,click Addin calendarat the top ofthe message to savethe invitationin your calendar. Select the calendarin whichthe invitation should be saved to.
You can bookmeetingsin various ways. Herewe tell you aboutthe various optionsandstep by step instructions ofhow to create one, including useful options to use.
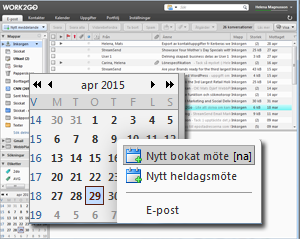
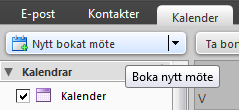
Click Newbookedmeeting.
Holdthe Nkey.
Right-clickon a datein the mini–calendar.
Drag and drope-mailsto the minithe Calendar.
Create a copy ofan existing meetingby right-clickingthe meeting > Create a copy.
In this example, we go through the stepsyou are takingwhenyou click NewBookedmeeting inthe toolbaron theCalendar tab. A newappointmentopens, ready to be filled in.
From: choose who to send the meeting invitations from. Subject: write a short description of the meeting.
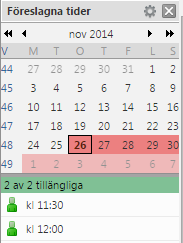
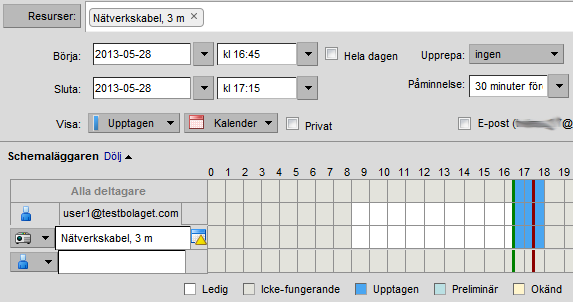
Now you can start using the tool scheduler to get help to see when the participants and registered places are available. The availability is displayed in time blocks of 30 minutes in the overview window to the right. You can of course fill in the information on your own; participants, location and the start and end time for the meeting as well. Is it an all-day meeting, check the box during the whole day.
Optional atendees: participant you might want to invite to the meeting, but whose participation is voluntary. Location: location for meeting. Equipment: book equipment needed for the meeting.
NOTE! Optional and equipmentis not displayedby default.To obtain thesechoices, click Show optionalordisplay equipment.
The toolwill help you tofinda convenient timetoschedule an appointment. When you addparticipantstothe meeting, you can inthe overview windowview their availabilityin30 minuteblocks.
Greenmeans thatall participants andat least one locationis available forthese days.
Red means that more than half of the participants can not attend the meeting on those days.
To select a suggested time, click on the row. Start and end time is updated in the reservation. The number to the right of the period is the number of places available for the moment. You can click on the numbers to see a list of suggested places available to choose from. The selected location is added to the Location field in the scheduler. To select a location, click on the number in line with the proposed time. Choose a place in the list that appears. The location is added to the Location field in the meetin invitation.
NOTE! Locations are shown only if they have been registered in your Administrator account.
To reserve a room you use the button Location to find a room for your meeting. If you don’t know which rooms are registered in order to be booked, just click on the Search button without entering any search criteria and you will get a list of all the registered rooms.
Book equipment is done by clicking the button Equipment. Don’t you see the button, click the text display equipment right of the Location field. If you don’t know what equipment you can book, click Find without entering any search criteria and you will get a list of all the equipments that are registered.
If the room or the equipment is already fully booked the selected time, it’s easy to see this in the list. You can see for how long the room / equipment is booked in the utility Scheduler.
When you click Send a confirmation message is sent to the person who organized the meeting and invitations to the invited persons. Since all bookings are accepted automatically if the resource is idle or is refused if it is already booked, you don’t need to log into any account to accept anything.
Show: choose the calendar status the participantswill havewhen theyare scheduledfor the meeting. Calendar: selectwhich calendar the meetingshould be savedto. Private: detailed information ofthe meetingis not displayed ifitis marked asprivate.In contrast, it displays information such asitsstart and end time, if it is arecurring eventand whohave bookedthe meeting.
Repeatselectwhen it’sa recurring meeting. Youcan alsogo toCustom andfill in additionalinformation aboutthe timeif desired. Reminderselectwhen the participantswillget areminder ofthe meeting. If youwant to be remindedof an appointmentto anothere-mail address, you can add itby clickingConfigure.
Attachment can be addedahead ifyouclick theclipat the toptoolbarand then click Browseabove whereyou fill ina message.
Inthe bottombox fill in the textyou want tosendalong with yourmeeting invitation.
Click send in the top left corner
The invitation isnow sentto the invited participants.Ifyou inviteyourselfto the meeting, you will not receive an invitationbut it will besaved in your calendarright away.
SaveClickto send theinvitationat a later date. This savesa local copy ofthe meeting, invitations will not be sentto the participants.
If you addan appointmentto ashared calendar, you may needto refresh your browserto seethe meetingin the calendar.
Here we showyou howyou can create acalendar and decide thebest settings for your need.
A Calendar already exists when you start using Work2Go. It’s called Calendar and its name can’t be changed. But you can of course create as many new ones as you need. For example, you can create one for work and one for personal activities and a third for company activities. You can switch between multiple views, drag and drop to move events from one calendar to another and share it with others.
Create a Calendar
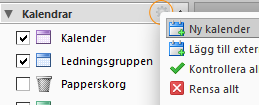
Create a new calendarby clickingthe gear iconat the right ofthe titleCalendarsinthe left pane > New Calendar.
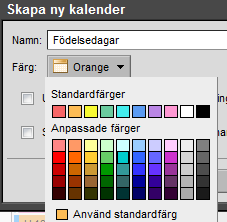
Givethe calendara nameand select a colourin the dialog“Createnew calendar.”
Select “Exclude this calendar when reporting free / busy time” if you do not want others to see when you’re free or busy when they book meetings.
Click OK and your new calendar appears in the left column.
Colour Coding Calendar
If you have multiple Calendars, it’s wise to give them different colors to easily distinguish them. There are eight colors to choose from and you can use one color several times. You choosing the color of a Calendar either when you create it or if you right-click it and select Edit Properties. You can also choose a Calendar’s color when you accept a sharing of another person’s Calendar.
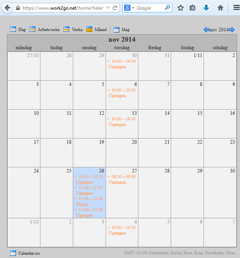
View your calendars in different ways
All of your Calendars (including shared ones) is visible in the Calendar list in the left column. Each Calendar has a check box to the left side of its name. Select the check box for each Calendar you want displayed.
At the top right corner of the toolbar, choose how you want to look at your calendars. To change the default view of the calendar, go to Preferenses > Calendar > General. If you choose to display as a list, you get a list of appointments for a period of two weeks for all the selected calendars.
Lista
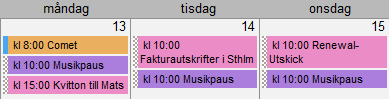
The list view show all meetings from all selected Calendars and they are listed by date and time, and displays information about the meetings, such as its subject, location, status, and if it is recurring or not. You can change the columns displayed by right clicking on the heading and uncheck those you don’t want to see. You can also sort the list by subject, status, or date. You can select several meetings and make changes to them all at once in the list view. Such as remove meetings from the Calendar, move messages from one Calendar to another, or mark meetings with a tag.
Free/busy
With the Free / Busy view brings up a schedule where you can see when your colleagues are available.