Archive | Administration of calendar

Search for lended equipment or rooms

If your company has registered your meetingrooms and equipment in your administrator account, you can search for them and book them from your calendar.
  1. Fill in what you are looking for in the search box at the top of the toolbar.
    If you are unsure what the resource has the name, you can search for it by starting to book a new appointment and then search for the resource.
  2. When searching from the Calendar tab, Booked meetings is already chosen,
    if not, select it in the menu on the search box.
  3. Show calendar as a list of the best overview of the search results.
    Click the arrow next to View in the toolbar and choose List from the menu.
  4. Set the time interval of the results.
    The results list below updates automatically.

Register rooms and equipment to become bookable [ADMIN]

To be able to book a room or equipment while creating a meeting invitation, they must have been registered in Work2Go first. Here we explain how.

alias1 Registration can only be made by the person / persons who have an account with administrative rights. Click the arrow next to your name in the upper right corner. You have administrative rights if you see the Administrator Console in the menu list.

1. Log on to the Administrator account.
All have at least one administrator account and usually it’s e-mail address admin@yourdomain.com

2. Click the arrow next to the account name in the top right corner to select the Admin Console and log into the admin interface (same login as to your account, the one you are already logged in).

3. Click Manage in the left column and then Resources.

resurs

4. Top right click the gear > New.

  • Name: the display name that is visible when you should book the resource.
  • E-mail: if there is a projector, you can eg write projektor@dindomän.se
  • Type: select whether it is a place or equipment.
  • Scheduling Policy: select the tour rule that fits best.
    We recommend using Auto-accept if possible, the deflection automatically conflict. When selected, approved reservation request automatically if the requested resource is available. If it is already booked deflected inquiry.
    It is a good idea to allow a number of conflicts in a reservation if you eg booking recurring meetings.
  • Forward calendar invitations: fill in to whom / which email / s booking inquiries should be sent.
  • Description: Fill possibly a description of the resource.
  • Click Next and enter any of the contact information for the person responsible for the reservation of rooms and equipment, if the person making the reservation need to contact someone.
  • Fill out any more information about the room as a place recorded, such as how big the room is, which floor or building it is in.

5. Complete the registration by clicking Finish.

Read more about the reservation policy


When the resources registered in the admin interface, you can choose from a range of different reservation policy. We usually recommend Accept automatically if possible, the deflection automatically conflict.

Automatically accept if possible, the deflection automatically conflict

When this rule is enabled, approved all reservations automatically if the resource is free and deflected if it is already fully booked. With this rule, it is possible to see the times at which the resource’s free / busy.

Accept manually deflectable automatically conflict

When this rule is selected Recorded deflected all requests automatically. All requests for an available resource preliminary reservation and must be approved manually. If you want to use this rule, we recommend you to forward a copy of the booking message to the account that you log on to manually accept the booking.

Always accept automatically

All resource reservations are accepted automatically, whether it is free or already booked up. An example of the use of this rule may be if you are often booking appointments in a public place that does not need to be booked first, but you want to get the site’s address and contact information in your invitation in a simple way.

Neither accept or decline automatically

All booking requests are handled manually.


Show the Content

When the rule deflector is automatically used, you can also add exceptions. That is to say that it is possible to book the resource even though it is already fully booked.

  • Upon registration of the resource is determined how many times or the percentage of those conflicts to be let through.
  • This is useful if you have recurring appointments or meetings that extend over a longer period. So that it is possible to reserve the resource during the time when it has not been double-booked already.


Publish calendar on website

How you can publish your calendar on a website or create a RSS feed from it.

Publish your calendar on a website

  1. Right-click the calendar > Share this calendar.
  2. Choose Share: Government
  3. Right-click the URL in the View > Copy Link Address.
  4. Click OK to close the box.
  5. Addthe URL in your HTML editor preferably in an iframe.

RSS

It is also possible to use RSS for calendar entries. Then, use the same URL as before, but writes .rss at the end of the link instead of .html.


Preferences for the calendar

Information about the different settings that you can do for your calendar on your account.

At Preferences > Calendar you decide how you want your Calendar to appear and how activities should be managed.

General

  • Select the default view of your Calendar: monthly, weekly, daily, as a list or schedule.
  • Set which day your week should start with.
  • Decide if your appointments should be set as public or private by default. (You can always modify this when creating a new Calendar.) When you receive Calendar invitations, they are marked as public if you have chosen public here. When private is selected, invitations will be marked as private instead.
  • Choose if you want your mini Calendar to be visible or not.
  • Decide if the week number should be visible.
  • Choose whether received invitations should be added to your Calendar automatically. If this option is selected, you can accept invitations from both e-mails and from your Calendar. If you haven’t selected this option you can only accept invitations by e-mail.
  • Enable if you want to delegate your Calendar for an Apple iCal CalDAV client.
  • Select whether e-mailed invitations should be removed when you have answered it.
  • Forward invitation e-mails to another email address.
  • How and when reminders for appointments should be displayed.

Work week and hours

  • Set how your work usually looks like to simplify meeting bookings.

Creating Appointments

  • Use the QuickAdd dialogue when creating new appointments. This is very useful if you create a lot of appointments that only include yourself.
  • Show timezone list in appointment view, which makes it more clear for you when you schedule meetings with people in different time zones.

Permissions

You can only make settings for persons of the same organization (using the same domain in the e-mail address) as you. You can use the full email address or just the username of the / those you want to specify permissions.

  • Set whether users should be allowed to see your free / busy time.
  • Specify who can invite you to meetings, all or certain users.
  • If you limit who can invite you, you can also choose to send an automatic reply message to let them know that they do not have permission to invite you.

Apple iCal

  • Enable to be able to see a calendar in Apple iCal.


Mark an appointment with a tag

Learn how and why to use tags in your calendar.

mote-etikett_w2g8

With the help of tags, you can categorize your calendar entries and appointments.
This may be useful if you are working on different projects at once and easily want to distinguish them in the calendar.

  1. Create calendar post.
  2. Right-click the entry in the calendar > Marking meeting > New tag or select an already created tag.

Print a calendar

Step by step how you print a calendar.

kalender-utskrift_W2G8

  1. Click on the printer icon in the toolbar.
  2. Print Calendar dialog box opens.
  3. Choose what / which calendar you want to print, date range and view (menu printing).
  4. Click print.

Import / Export a calendar

You can import Calendars saved in .ics format.
Likewise you can export your Work2Go calendars.
  1. Go to Preferences > Import/Export.
  2. If you want to import, you find your file by clicking the Browse button under Import.
  3. If you want to export, select Type and Source under Export.
  4. You may also use the Advanced Settings button and select which folder you want to export.

Introduction to the Calendar

Here we show you how you can create a calendar and decide the best settings for your need.

A Calendar already exists when you start using Work2Go. It’s called Calendar and its name can’t be changed. But you can of course create as many new ones as you need. For example, you can create one for work and one for personal activities and a third for company activities. You can switch between multiple views, drag and drop to move events from one calendar to another and share it with others.

Create a Calendar

  1. skapaKalender_w2g8
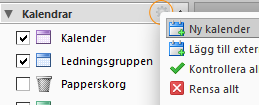
Create a new calendar by clicking the gear icon at the right of the title Calendars in the left pane > New Calendar.
  2. Give the calendar a name and select a colour in the dialog “Create new calendar.”
  3. Select “Exclude this calendar when reporting free / busy time” if you do not want others to see when you’re free or busy when they book meetings.
  4. Click OK and your new calendar appears in the left column.

7_skapa_kalender2
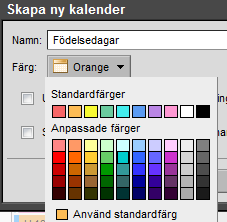
Colour Coding Calendar

If you have multiple Calendars, it’s wise to give them different colors to easily distinguish them. There are eight colors to choose from and you can use one color several times. You choosing the color of a Calendar either when you create it or if you right-click it and select Edit Properties. You can also choose a Calendar’s color when you accept a sharing of another person’s Calendar.

View your calendars in different ways

All of your Calendars (including shared ones) is visible in the Calendar list in the left column. Each Calendar has a check box to the left side of its name. Select the check box for each Calendar you want displayed.

visaKalender_w2g8

At the top right corner of the toolbar, choose how you want to look at your calendars. To change the default view of the calendar, go to Preferenses > Calendar > General. If you choose to display as a list, you get a list of appointments for a period of two weeks for all the selected calendars.

Lista

7_visa_lista

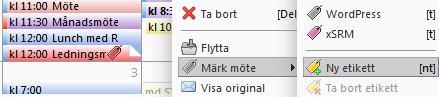
The list view show all meetings from all selected Calendars and they are listed by date and time, and displays information about the meetings, such as its subject, location, status, and if it is recurring or not. You can change the columns displayed by right clicking on the heading and uncheck those you don’t want to see. You can also sort the list by subject, status, or date. You can select several meetings and make changes to them all at once in the list view. Such as remove meetings from the Calendar, move messages from one Calendar to another, or mark meetings with a tag.

Free/busy

With the Free / Busy view brings up a schedule where you can see when your colleagues are available.