Archive | E-mail

Share an e-mail folder

You can share all your e-mail folders, including the inbox and its sub folders with internal users.

A copy of the shared folder will be placed in your friend’s folder list and he/she won’t need to log into your mailbox to read its content. When you set up sharing of a folder you also set up access privileges by giving the other user a particular role.

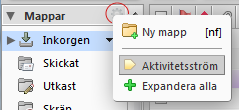
  1. Right-click the email folder you wish to share > Share Folder.
  2. Share the folder with Internal users or groups.
  3. Fill in the email address of whom you wish to share your folder. (Comma separated if there are more than one.)
  4. Choose a suitable role and whether you want to send out a message informing about the sharing > click OK.

Roles with different access-rights

None – Use to temporarily disable access to a shared folder without revoking the sharing. The folder will still remain with the one you shared it with, but they can no longer see its content.
Viewer – Can read the content, but may not make any changes to it.
Manager – Can read and edit the content, create new subfolders, and delete files.
Admin – Can read, edit, add, delete, approve, reject and administer content.

Scenarios for sharing an email folder

  • Your sales department wants a central mailbox for all incoming product inquiries. Everyone should be able to view messages immediately when they are received and should also be able to respond from the same address.
  • A manager is often in the office but doesn’t have time to answer her emails. Instead she gives her assistant access to her Inbox, who can manage thecontent of the Inbox, respond to messages on her behalf, create folders to organize and also delete messages.
  • Instead of sending out emails to dozens of addresses each time you have an announcement, you can share one of your folders and keep it as a public folder containing your announcements. Either you protect its content with a password or hand out it’s URL for anyone you want to access it.

Get less important e-mails moved from your inbox

You can set a filter to receive e-mails that are less important, such as newsletters and updates from social media, to be delivered to a separate folder instead of your inbox.

The folder Activity Stream is placed in your personal list of folders in the overview window to the left, so that you can easily go through its contents when you have spare time.

  1. aktivitetsstrom1Click the gear icon next to the title Folders and select Activity Stream.
  2. Put a checkmark in the box by Moving messages to activate the activity stream and then choose which messages you want to get moved automatically. Then click Save.

The following types of messages can be moved

  • Messages sent to a distribution list that you are a member of
  • Commercial mass mailing
  • Messages where your address is not in the To or in the To or Cc fields
  • Messages from people who are not in your address book

You can also tune these settings further if clicking Advanced Controls. Then you can get messages marked with a tag, already read, flagged or redirected to a different e-mail address.

Create filters to sort e-mails

Filter helps you to get control of your inbox and sort incoming and outgoing e-mails automatically for you.

filter

Go to the Preferences tab > Filters.

  1. Create a filter for incoming or outgoing e-mail by clicking on the appropriate tab.
  2. Click New filter and the Add Filters window opens.
  3. Give the filter a suitable name and tick the filter to be active.
  4. Set the conditions to suit the purpose of the filter.
  5. Don’t process additional filters should be checked. Click OK when finished.

One of – means that when one of these conditions is met, the action will be applied.
All – means that all conditions must be met for the action to be performed.
These steps can be repeated if the filter should include more conditions and actions.
Select the appropriate option from the drop down menu.

Creating a filter from an email

Right-click on a message or e-mail address and select New Filter / Add to Filter > New filter.

Example of how a filter can be created and used

For example if you want all messages from a particular e-mail address with a particular subject should be placed in a special folder, you can select the following settings.

  1. If all the following conditions are met:
  2. From – matches exactly enter the actual email address in the box.
  3. Click + to add another condition.
  4. Subject – contains enter the e-mails subject in the box.
  5. Perform the following actions: Save in folder (to find the right folder click Browse …)

Add other e-mail accounts in your Work2Go

You can add more e-mail accounts to your Work2Go and thus gather all your e-mail inboxes in one place.

7_skapa_ext_konto1

1. Preferences > Accounts.
2. Click Add external account and fill in the information under Settings for external account.

In this example, we added an account from gmail.com. If you want to add an account from another provider, you must have the correct settings to add an IMAP account from them first.

7_skapa_ext_konto2

3. Fill in e-mail address and account name.

7_skapa_ext_konto3

4. Select the account type IMAP and fill in the settings that you have received from your other email provider.
5. Click Test Settings to check that you entered the correct information.

7_skapa_ext_konto4

6. Decide where you want the messages sent to this email address should be saved.

ext_konto
7. Enter your name and activate Reply to if you want to use this feature.

8. Click Manage signatures to add a signature.

9. Click Save in the top left corner when you are finished.
When sending e-mails from this account, select it in the dropdown menu at From when you type it.

Use different roles for different assignments

Here we explain how you can send e-mails from a different addresses even if you are still logged in to your own account.

roll

It’s useful to create different personas (roles) if you sometimes want to send business e-mails from your company (info@yourdomain.com) and at other times private e-mails from you (name@yourdomain.com).

  1. Go to Preferences > Accounts.
  2. Click Add Persona.
  3. Fill in your information under “Persona Settings”.
    Persona name, this is what you will see when you choose which persona you want to send your email from in the toolbar. You won’t see this name in the actual e-mail when you send it.
  4. Type in the name you want to appear in the “From” field of outgoing emails.
    Select what email address you want to send emails from.
    NOTE! E-mail address must be registered in Work2Go, either as an account or as an additional email address/alias.
  5. If you want the recipient to respond to another email address instead, tick the box next to “Reply-to” and select an email address from your list.
  6. Select a signature for the persona. If you haven’t already created one you can add it later. If you don’t want a signature added automatically, select “Do not attach signature”.
  7. Decide if you always want to select this persona automatically when replying e-mails  sent to the specified email address or when you get a response to a particular folder.
  8. Click Save at the top left corner when you are finished.

Create more e-mail addresses / aliases [ADMIN]

You can have an endless number of email addresses linked to your account as aliases. Log in as administrator and add them as aliases.

alias11. Login on your admin account.
All customers/domains have at least one administrator account and usually it’s the e-mail address admin@yourdomain.com

2. Click the arrow next to the account name in the top right corner to select the Admin Console and log into the admin interface (same login as the account that you are already logged in).

alias2

3. Click Manage in the left column and then Alias.

alias3

4. Click the gear in the top right corner > New.

5. Enter the new e-mail address you want to create, for example info@yourdomain.com and then the e-mail address of the account that messages should be directed to (eg your e-mail address) > OK.

Alias is useful to create if your name in your e-mail address have differrent but common spelling variations. For example, your name is John Johnston and your e-mail address is john.johnston@yourdomain.com, it could be useful to create following aliases jon.johnston@yourdomain.com, jon.jonston@yourdomain.com and john.jonston@yourdomain.com

Dynamic email aliases

Work2Go also gives you the possibility to create dynamic aliases. You can write “+text” after the first part of the e-mail address, eg “anna+important@yourdomain.com”. The message will then be sent to the inbox of “anna@yourdomain.com”. If you then have a filter containing “+important” such message will be moved to a particular folder when they are received.


Create a signature

A signature usually includes your name, contact details and other informative text. If you format it with HTML, you can also add pictures and link to a website.

You can create multiple signatures in your account. It can for instance be useful to create a more formal signature when you send e-mails to your customers and another for when you send to your friends.

When writing your message, select the signature to be used by clicking Options and Signature in the e-mail message toolbar. If you create multiple e-mail identities (roles), you can create a different signature to use for each different role.

skapa-signatur_w2g8

  1. Go to Preferences > Signatures and click New signature.
  2. Give the signature a descriptive name (especially important when you create multiple signatures).
  3. Select Format as HTML.
    (Format as plain text means that you can just fill in the text, no sign, image, etc.).
  4. Then create the actual signature in the box below.
  5. To add a logo put the cursor where it should be and click Insert image (icon with a picture of a tree). Click Browse to pick the image file from your computer.
  6. Select the signature to be used automatically when you write new messages or / and respond / forward from a particular sender / role.
  7. Determine whether the signature should be placed above or below the included messages.
  8. Click Save at the top left corner when you finish.

Create a signature from an HTML file

  1. Go to Preferences > Signatures and click New signature > Format as HTML.
  2. Open your HTML file in a browser.
  3. Select the text and copy.
  4. Paste it in the box for signature in Work2Go.
  5. Make any corrections.
  6. Place the cursor where the image should be and click on Insert image (icon with a picture of a tree) Click Browse to pick the image file from your computer.
    NOTE! If the HTML code for the image came with when you copied from the HTML file, you will see a broken link when you click on the icon to insert the image. Erase box and add the image file again.
  7. Click Save in the upper left corner.

Create an auto reply message

Here we show you how to create an auto reply message.

franvaromeddelande

Auto reply messages can be practical to use even when you’re at the office. You might have a lot to do, a tight deadline or something else when you simply don’t have time to take care of e-mail in a few days. Create a reply message saying you have received their message but your reply may take some time. Anyone who sends you a message will get a confirmation that you received the message directly and thus become less impatient with getting answers from you.

To create an auto reply message, go to Preferences > out of office.

  1. Click Send auto-reply message when you want to activate and/or create one.
  2. Enter the message in the auto-reply message box.
  3. Specify time period.
  4. Check the box Show free/busy in your calendar and choose between Out of office or Busy to be shown in your calendar during this period. By default only one away message will be sent per incoming sender/e-mail address during a seven days period. Contact us if you want it to be sent out more often.

Out of office messages

Here we show you how to create an out of office message.
You can have two different ones activated at the same time.

franvaromeddelande

To create an out of office message go to Preferences > out of office.

  1. Click Send auto-reply message when you want to activate and/or create one.
  2. Enter the message in the auto-reply message box.
  3. Specify time period.
  4. Check the box Show free/busy in your calendar and choose between Out of office or Busy to be shown in your calendar during this period. By default only one away message will be sent per incoming sender/e-mail address during a seven days period. Contact us if you want it to be sent out more often.

Send different reply messages at the same time

You can send two different kind of response messages at the same time.
One to your colleagues (and possibly also those saved in your address book) in the top box and another perhaps more formally in the second box. To activate the second message select the box by External Senders and choose who you want to send this message to.

  • Everyone who writes to you outside your workplace, from an e-mail address with a domain other than the one you use.
  • Select Anyone outside my domain except those in my contacts, if you want to send the more personal message to all your contacts and your colleagues, and the more formal message to external senders, the message in the box below.