Archive | E-mail

Setting up account in MS Mail app [Pro]

Select Exchange ActiveSync

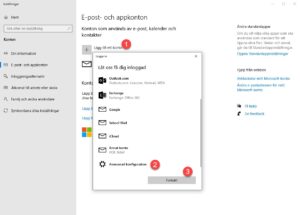
Go to Email and app accounts

Add an account (1)
Select Advanced configuration (2)
Continue (3)


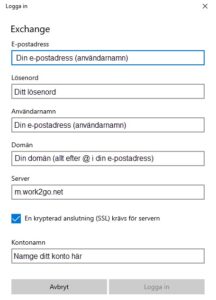
In the next popup, enter:

Your email address (username)
Your password
Your email address (username) again
Domain (everything after @ in your email address)
Server: m.work2go.net
As well as naming your account
Then click on Log in. Done!

Sync contacts on Mac

Follow the steps below to sync your contacts from Work2Go to the Contacts app on your Mac.

1. Open the Contacts app.

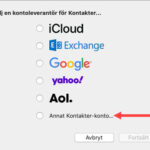
2. Click on Contacts at the top left and select Add Account…


3. Select Other Contacts Account…


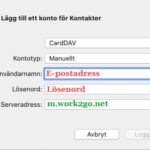
4. Fill in the information below.
Account Type: Manual
Username: Enter your email address
Password: Enter password
Server address: m.work2go.net


5. Click Sign in > Done.

All contacts are now syncing, this will take a few minutes.

Sync Calendar on Mac

Follow the steps below to sync your calendar from Work2Go to the Contacts app on your Mac.

1. Open the Calendar app.

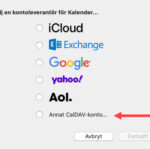
2. Click on Contacts at the top left and select Add Account…

3. Select Other CalDAV Account…


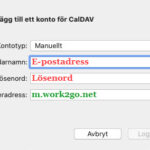
4. Fill in the information below.
Account Type: Manual
Username: Enter your email address
Password: Enter password


5. Click Sign in > Done.

The calendar is now synchronizing, this will take a few minutes.

Double folders sent and draft

Do you use an e-mail application on your computer? Then it is wise to link the program’s Sent and Trash folders with those on the mail server. Here we tell you how.

When adding your Work2Go account in an email application on your computer or mobile phone additional folders are created for activities performed in the other application. Folders such as Drafts, Sent and Trash.

To avoid confusion, you can link these folders so that all messages sent, whether they have been sent from a mobile or Work2Go in a browser, are saved in the same folder. In an iPhone you can link foders as follows:

Preferences > Mail, Contacts, Calendars > Select your account > Account > Advanced > Mailbox

Save Sent and Trash on the server

Once you have your e-mails in Mac Mail, it is wise to connect the program’s Sent and Trash folders with those on the mail server. Here we tell you how.

By default, no messages that you send or delete in Mac Mail are saved on the server, this means that messages you send, for example, does not appear on your other devices attached to your e-mail account or when you log in to your account in Work2Go. Follow the steps below so that your messages will be saved on the server instead of locally in Mail on your Mac.

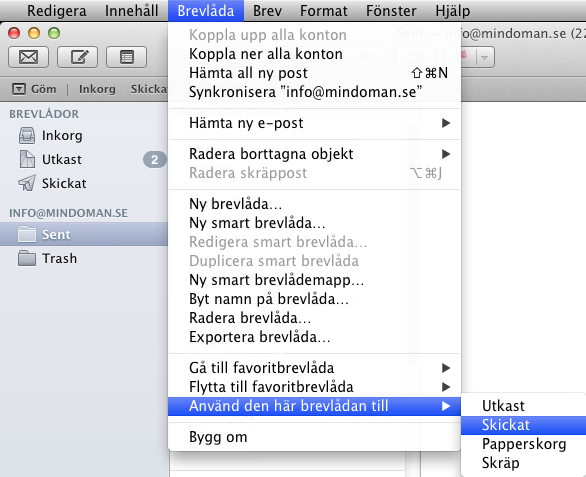
MacMail_mappar

  1. Select the Sent folder under your account in the left column and click the menu Mailbox > Use This Mailbox for > Sent.
  2. Mark Trash folder > click menu Mailbox > Use This Mailbox to > Trash.
  3. Restart the program.

RSS feeds to your inbox

Once you have set up an RSS feed on your account, you’ll notice as soon as the information has been updated on the website as the rss comes from. Here we tell you how.

There is a simple way to know if a website has published new articles and news or blog posts. It keeps track with the help of a so-called RSS feed. In your Inbox Work2Go you can add subscription to RSS feeds that you are interested in.

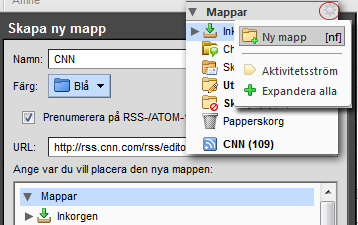
RSS8

  1. Find out the URL to the RSS feed. Look at the supplier’s site or ask their support.
  2. Click the gear icon located above your Inbox in the top left corner > New Folder.
  3. Give the folder an appropriate name.
  4. Check the box to subscribe to the RSS / ATOM Feed
  5. Fill in the URL of the RSS feed.
  6. Click the box below to select where the new folder will be saved. If you want it to be on the same hierarchical level as your Inbox, select the folders at the top of the box.
  7. Click OK.
  8. The new folder’s icon changes automatically into an RSS icon and the previously released posts / broadcasts starts to download.

The folder is updated automatically every 12 hours. If you want to update the content anytime, right-click the RSS folder > Load flow.

Always display images from certain senders

Read this if you want to avoid clicking to see images in emails you receive.

bild_i_mejl1

Click at the top of the message and click on the sender in the yellow bar to once and for all accept viewing all images in future messages from that particular sender.

  • If you click on the domain you accept images from any e-mail addresses with the domain, for example, both info@domän.se, market@domän.se etc.
  • If you click on the specific e-mail address, for example info@domän.se pictures will always appear automatically when you receive emails from info@domän.se, but when you get emails from market@domän.se the images were hidden and you must agree to display them to see them.

Creating a list of trusted senders

You can also create a list of trusted addresses / domains on the Preferences tab.

  1. Go to the Preferences tab > Trusted addresses
  2. Fill in the e-mail address or domain that you trust and that you always want to see pictures from.
  3. Click Add and then Save in the upper left corner.

The reason why Work2Go don’t show images in e-mails without your consent is that it is relatively easy to hide a virus in an image file. Therefore, be careful and only approve those senders that you really trust.

Can you really get rid of all spam?

No, not all of it. Only about 95-99% or so. But in all honesty it does not disappear – it is sorted.

What is considered as spam is also of subjective matter. What is spam to you might not be spam to others and vice versa. Therefore spam filtering is not an exact science. At some time now and then one slips through the spam filter in your Inbox and unfortunately, sometimes a normal email can be put into the Junk folder. This is inevitable. Even if we’d like to be able to  provide you with a 100% spam free Inbox, we can’t keep a promise like that.

What is essential however is that you can easily delete spam and retrieve emails that has accidently ended up in your Junk folder. Work2Go send out a daily overview report where you easily can retrieve any legitimate mail in your Junk folder. If you mark an email as not spam, the sender will be whitelisted and it won’t happen again.

All contacts in your Address Book is automatically whitelisted!


Why is it taking so long before my e-mails arrive?

Delay of e-mails may be due to greylisting, which is used in Work2Go to prevent spam. Here we explain more about it and what you can do about it.

Simplified, one can say that when greylisting is in use and a new email address is sending you an email, Work2Go ask the one who’s sending you the email to resend it and if they do, the email will be put through to your Inbox. Spammers never resend their emails and that is precisely why greylisting is so effective. Normally, the sender’s mail server tries to resend the email again after 3-6 minutes. Unfortunately, not all mail servers handle this very well, which is a major weakness and that’s when things go wrong.

Greylisting is a very effective method of fighting spam because spammers are not trying to send their messages again.

This is how it works

When greylisting is in use, three components are checked for incoming email:

  • The IP address of the sending mail server.
  • The sender’s email address.
  • Recipient’s email address.

If this combination is unknown an error message (error 451) is sent to the sending server with a requests for a resend. When a server resend the email, it will be put through. When this combination is sending you a second email, it will be checked in the greylisting database and then automatically be put through to you.

In case of unusually long delays

The reason behind long delays are misconfigured servers. Not broken servers, but misconfigured ones. What happens is that greylisting asks the other server to “try again later”. A correct configured mail server will then try again later. The problem is that many servers do not try again for several hours (or in worst cases, several days) later. A correct configured server tries to deliver it within 30 minutes. If it receives another error message it will try again, but this time wait a bit longer before the third attempt.

In case of a delay to certain recipients

If you continually have problems with the delivery time to certain recipients, we can whitelist them for you. When whitelisting an email address, greylisting is turned off for emails that is sent between specific recipients. You can whitelist both email addresses and domains you consider to be trusted. The risk with whitelisting is however an increase of spam sent to your account. But if that’s the case, we can of course turn on greylisting for you again. We can even reduce the rules for spam filtering for your email address if you often experience very long time before emails reach you. Another idea is to send us a list of domains you communicate with regularly for us to whitelist for you.

If you use an email application for Work2Go

If you use an email client such as Outlook, we recommend you to send email with our server and not through your ISP. You configure the server setting’s in your email client’s account’s preferences.
When should I use conversation view?

visa

E-mails can be displayed in a variety of ways. View by conversations are useful when:

  • You read the e-mail less frequently and therefore have more messages to show at a time.
  • You have many messages with discussions that are sent back and forth.
  • You need to see who has responded Who in a context.


Redirect e-mails

You can forward emails so that it does not look like it has ever been in your inbox. This is how.

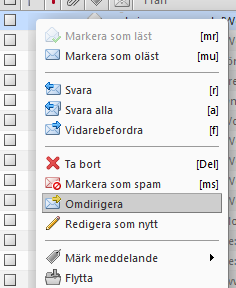
omdirigeraYou can forward e-mail messages that you have received to another address, so that it looks like it has been sent directly from the original author. The difference between the redirect instead of forward messages is that if you redirect it and it makes it easier for the recipient to respond to the original sender.

  1. Right-click the message and select Redirect.
  2. In the text box, enter the recipient’s address.
  3. Click OK.

Read receipt

When you receive a message

kvittoThe general settings that can be done in Work2Go applies only how to handle incoming requests, we recommend using the “Ask Me” so you per message can choose if you want to send out an read receipt or not. Settings > E-mail: Receipt of notice

When you send a message

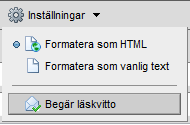
7_kvittoTo request a read receipt on messages sent from yourself, choose this option per message, instead of changing the general settings in case you want or do not want to request a read receipt on all sent messages.


Send email later – scheduling

What to do if you want to write a message now, but have it sent automatically at a later time.

send_later

  1. Write your message and fill in the recipient’s e-mail address.
  2. Click the arrow next to Send on the toolbar.
  3. Select Send later.
  4. Set the desired date and time when you want the message to be sent.
  5. Click OK to save.
  6. E-mail is saved in the Drafts folder until it is sent.

Send to a mail group without getting your own copy

If your business has any employees’ e-mail addresses collected in a list such as name staff@yourdomain.com and you want to send a mail to all of your colleagues, but think it is unnecessary that the message also will reach your inbox, you can do a setting on your account that prevents this. The message will of course be sent to all the others that are on the list.

mailgrupp-till-mig

  1. Go to the Preferences tab.
  2. Click Mail in the left column.
  3. Scroll pretty far down on the page until you get to the headline Receiving messages.
  4. The section at the bottom of this box Messages from me.
  5. Here you select the Ignore message.
  6. Then click Save in the top left corner.

Get old messages deleted automatically

This allows you to activate your own storage policy for individual folders in Work2Go.

Once you have enabled the Message Disposing of a folder is messages deleted from the folder that are older than the specified time. This happens automatically. Should you later want to restore these deleted messages go to trash > Deleted Items.

  1. Right-click the folder and choose Edit Properties.
  2. Click the Retention tab and Enable message disposial.
  3. Enter the appropriate time and save, click OK.

The policy that gives you a warning when deleting

This allows you to activate your own storage policy for individual folders in Work2Go.

Once you have enabled the Message Storage for a folder, you receive a warning message if you try to delete a file within the specified date range. The warning message will serve as a reminder that you should not delete the file yet.

  1. Right-click the folder and choose Edit Properties.
  2. Click the Retention tab and the Enable message retention.
  3. Enter the appropriate time and save, click OK.


E-mail addresses are displayed as names in bubbles

Name in the address field appears in a bubble instead of a text in which the entire e-mail address is visible. Here we tell you more about what it means and its benefits.

Bubbles are more interactive and can be moved by drag and drop and edited by right-clicking on them. The feature is enabled by default, but can be changed back to normal text on Preferences > General > Other: Bubbles.

See more details about the person in the bubble

bubblor8_1

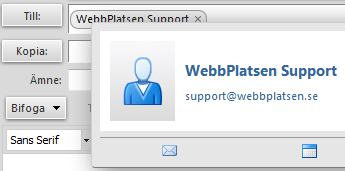
Keep your cursor over a bubble and the person’s name, e-mail address and any other contact details and a picture will be visible, but also quick links to write a new message or schedule an appointment with the contact.

Right-click a bubble when you read e-mail

bubblor8_2

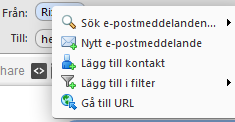
When a menu appears from where you can search for more messages from / to the person in the bubble, write a new, add the contact to your address book, add the address in a filter or visit the address of the website.

Right-click a bubble when sending e-mail

Bubblor8_3

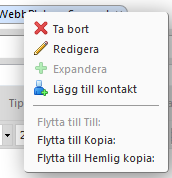
When a menu appears from where you can save / edit the contact in your address or move it to a different address field.


Drag and drop bubbles to move contacts

bubblor8_4

You can move one or more bubbles by drag and drop.
To select multiple bubbles at once, try using the Selection tool “rubber band”. Left click the white space in the field and drag a box over selected bubbles. The selected bubbles are now highlighted in blue and can now be dragged and dropped simultaneously.

Find missing e-mails

By sorting your e-mail

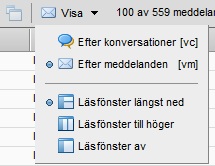
7_visa_mejlMake sure you use the display mode Reading Pane at the bottom or the Reading Pane off by clicking on View in the toolbar in the upper right corner. And View your messages after messages.

Now you can sort your e-mails according to whether they have been flagged, tagged, sender, attachment, subject, size or date when it was sent by clicking on each title.

search1

By searching for the message

  1. Fill in what you are looking for in the search box at the top and click on the magnifying glass.
  2. Search tab opens with the result. If you still can not find what you are looking for you now have the opportunity to refine your search using multiple filters.