Archive | E-mail

Why don’t I receive any e-mails?

Here we explain why you do not always get all e-mails that actually have been sent to you.

Work2Go includs a proper spam protection that include a stop frauds and other promotional messages from reaching your inbox. But when you send e-mails, it’s far from just Work2Gos spam protection that decides if a message should be delivered or not. When the e-mail is sent its delivery is controlled of various regulatory framework for spam protection, these also regulate according to a series of set rules for what is considered to be ok or not. The internet is originally a system that requires all participating online to behave nice and with good intentions, which in today’s modern society unfortunately exploited.

The reason why a message may be stuck on the way to your inbox can be…

  • message formats,
  • its contents, or
  • its attachments.
  • It can be from a supplier that has become blacklisted
    (because the former has sent out tons of spam).
  • Your inbox is already full.
  • The sender has misspelled your email address.
Contact our support if you’re missing any e-mails.

Why won’t my message reach the destination?

Sometimes it happens that a message bounces, which means it can not be delivered for some reason. Here we mention some examples of the most common causes.
  • The recipient does not have a valid e-mail address.
  • Recipient’s e-mail system rejects the message for one reason or another.
  • The recipient’s mailbox is full.

If your e-mail is rejected by the recipient’s e-mail system, you will receive a message. This usually contains the following information.

  • At least part of the contents of your original message.
  • Some system-generated error messages that give more information about why the e-mail was bounced.


Do not be disturbed every time you receive new e-mail

There are settings you can change, indicating how you find out that you have new email messages.

If you receive many e-mails in your inbox and are easily disturbed by the sound / blinking browser / message box is displayed for incoming messages, you should change the settings for receiving messages.

  1. Go to the Preferences tab> Mail > Receiving messages.
  2. Correct the settings for message arrival.
  3. Click Save in the upper left corner.

Can’t send nor receive e-mail in Mac Mail

Are you not receiving emails on your computer? Or you can not send? Go through the following steps to check the settings.

MacMail_Fel_11. Check your account settings

  1. Go to Mail > Settings > Account > Account information.
  2. Click Edit Server List.
  3. You can find Server Outgoing mail (SMTP)” at the bottom of the Account Information page.

Click image for full version.

2. Delete any duplicate e-mail server

9-IMAP_Mac10.9-serverlistaIf it looks like the image, i.e. a line that only says m.work2go.net but without an email address. Click on that row (without an email address) so that it becomes highlighted, and then on the (-) minus sign down in the left corner to delete that.

Click image for full version.

3. Check the mail server ports

MacMail_Fel_2Outgoing server: Go to Advanced.

  • Use port 465 (or 587).
  • Use SSL.
  • Fill in username and password again.
    (Test your login details by signing in to your account on work2go.net)

Click OK.

Click image for full version.

MacMail_Fel_3Incoming server: Go to Advanced on top of the page.

  • Port: 993
  • Use SSL.
  • Fill in username and password again.
  • (Test your login details by signing in to your account on work2go.net)

Click image for full version.

Can’t send e-mail in ZD Work2Go Mail

Can’t send email from your computer? Go through the steps below to check the settings.
  1. Do you have the correct username and password?
    Test them by logging in to your Work2Go in a browser: work2go.net
  2. Your account is not full already, is it?
    Hold your cursor over your name in the upper right corner of Work2Go to see your account size.
  3. Open ZD Work2Go Mail and go through all the settings for the account and re-enter the password. Check the box for Username and password required to send mail.

If the above did not help, contact our support.

Can’t send e-mail in Thunderbird

Can’t send email from your computer? Go through the following steps to check the settings and if that does not help, try another security type and port.
  1. Do you have the correct username and password?
    Test them by logging in to your Work2Go in a browser: https://www.work2go.net/
  2. Your account is not full already, is it?
    Hold your cursor over your name in the upper right corner of Work2Go to see your account size.
  3. Open Thunderbird and go through all the settings for the account and re-enter the password.
  4. Change to no SSL and port 2525.

Create a new e-mail message

Learn about the features you can use when creating new e-mails.

skrivaw2g8

Click New message.

Who would you like to send from?

fran_w2g8

If you have multiple e-mail addresses (roles) on your account, select the role you want to send your message from.

Who do you want to send?

7_gal_addr
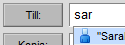
Please enter the e-mail address of the / those you want to write to in the To or Cc-field.
You can either type the address yourself or tap To to search through your address books. If the address is already saved in Work2Go you will get a list of hit results that match what you type and you won’t need to enter the entire address yourself but just choose the right one from the list.

If you want to send a blind copy to someone and do not see the field, click Show Bcc right of the Cc field.

Write the message and attach a file

7_amne_prio

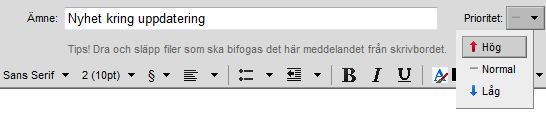
Write an appropriate subject for the message and select a priority if needed.

bifoga
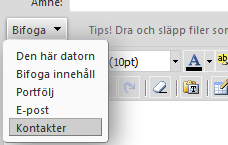
Click the arrow next to Attach to send one or more files. You can attach files saved in your computer or briefcase in Work2Go. If it’s an image, you can choose whether you want the image to be visible in the message itself or whether it should only be attached as a file. You can also attach another e-mail message from your mailbox or a contact from your address book.

Type your message and correct the formatting if needed.

Check spelling and other settings

stavning_w2g8
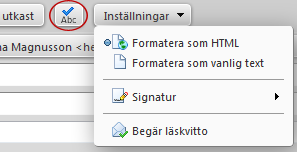
To check the spelling in the message, click the ABC button at the top.

To get a read receipt when the recipient opens your message, click the arrow at the top Options > Request read recipt.

To change the signature, click the arrow at the top Options > Signature.

Send now or later?

7_skicka
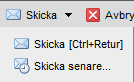
If you don’t want to send the message immediately you can save it and send it at a later time, click Save draft.

To schedule when it should be sent instead, click the arrow at the Send > Send later and the message will automatically be sent along the time you specify.

Do you want to send your e-mail now, just click Send.


5 to consider before you send

  • Read through the message before you send it.
  • If anything needs fixing, specify what in the subject line.
  • Write short and concise.
  • Include people who need to be informed on the Cc line.
  • Include people who you need to respond to or act on the To line.


Make Work2Go to default e-mail program

How to set Work2Go to opened when you want to send e-mail from a web site or application.
In many programs and websites you can click a link to get information sent as an email message. You can set Work2Go as your default e-mail application, which means that if you eg click a link for sending information from a web page as an email message, a new message opens in your account in Work2Go with the address and the information already filled in for you.

Set default e-mail program in Firefox

mailto1_firefox1. Click the menu in the top right corner > Settings.
2. Go to the Programs and scroll the list until you come to mailto.
3. Click the arrow and select Use Work2Go > OK.

mail2_firefox2


Print a message

skrivUt

  1. Select the message you want to print.
  2. Click Actions on the toolbar > Print.
  3. The printable message will be open in a separate window in your browser.

The print has too small / large font size

If you want to change the font size of something you want to print from Work2Go you can increase or decrease it. Go to the Preferences tab > General > Other.


Keep your eyes on your colleague’s inbox

If your colleague doesn’t have the ability to log into their account for a period of time, you can set it up so that you receive an alert to your inbox when your colleague receives new s e-mails.

The information in the message is; who sent the e-mail and its subject. This is sent out at the same time as the original message is received. This way you can also find out when the original e-mail was sent.

  1. On your colleague’s account, go to the Preferences tab> Mail: Receiving messages
  2. Enable the notifications of new emails and fill in your e-mail address.

Forward e-mail to another address

You can also forward copies of incoming e-mails to another e-mail address and select whether the message should be saved in the inbox or not. The setting is made in the same place, ie Preferences > E-mail: Receiving messages.

Ask your colleague to send emails for you

Here we tell you how you can get help from a colleague to send e-mails so that they appear to come from you without sharing your inbox.

You can give other users permission to send e-mail on your behalf, from their own account. You can share a folder you need help with, but the sharing isn’t necessary.

  1. Go to the Preferences tab > Accounts.
  2. Check that the primary account is selected and click Add Delegat at the bottom of the page.
  3. Enter the e-mail address of the person you want to delegate permissions to. This must be an internal user address (ie an e-mail address with the same domain after the @ as yours).
  4. Add the sender for the messages that will be sent on your behalf.
    Send as only your email address as the sender
    Send for both your and your colleague’s email address as the sender
  5. Click on OK to save.
  6. An email message is sent to your colleague telling you that you have given the person permission to send e-mails on your behalf. Your colleague now needs to log out and log back in to their account for the change to go through.
  7. When your colleague creates a new e-mail message s/he choose your name from the dropdown menu at the From field.

Collect sent e-mails when replying from a shared inbox

When you reply to a message in a shared mailbox, the other ones (who also has access to that mailbox) can see that you have replied, but not what you have replied. The answer itself ends up in your own private sent folder.

To collect your answers you can create a folder and a filter.

  1. Create a new folder that you save in the level below the shared folder.
  2. Go to the Preferences tab > Filters.
  3. Click the Outgoing Message filter> New filter.
  4. Give the filter a suitable name and the conditions as in the picture below.
  5. Keep the box in front of the Do not process more filter selected > OK.

filter-villkor

Delete e-mails

E-mails can be deleted in several ways and if you change your mind, you can easily change your mind.
  • Drag and drop to the trash.
  • Select one in the list > click Delete in the toolbar.
  • Select one in the list > right click > Delete.

ta-bort

Cancel previous action of deleting a message

It’s possible to cancel previous action when one has just performed an action such as deleting an email message. Just click on the Undo at the top of the page.

angra_misstag

Recover deleted e-mail

It’s possible to retrieve deleted messages, even if they are left in your trash.

  • Right-click the Trash and select Restore deleted items.
  • Now choose if you want to read back all or just pick out one or two of them.
  • For multiple selections, hold down the Ctrl key when you select the ones you want to restore.

aterstalla_mejl

Can’t receive e-mails in ZD Work2Go Mail

Are you not receiving emails on your computer? Go through the steps below to check the settings.
  1. Are you using the correct username and password?
    Test them by logging in to your Work2Go in a browser: work2go.net
  2. You haven’t acceded your account limited size, have you?
    Hover your cursor over your name in the upper right corner of Work2Go to see your account size.
  3. Open ZD Work2Go Mail, go through all the settings for the account, and re-type the password.

If the above did not help, contact our support.

Can’t receive e-mails in Thunderbird

Don’t you receive any e-mails to your computer? Go through the following steps to check the settings.
  1. Are you using the correct username and password?
    Test them by logging in to your Work2Go in a browser: https://www.work2go.net/
  2. You haven’t acceded your account limited size, have you?
    Hover your cursor over your name in the upper right corner of Work2Go to see your account size.
  3. Open Thunderbird and go through all the settings for the account, and re-type the password.
  4. Remove SSL and change to port 143.


Add an e-mail account in Mac Mail

Follow our step by step guide of how to create an account to read and send e-mails from your computer. Do you already know how, click the box below for account settings.

1-IMAP_Mac10.9-start1. Open the program

Click Mail > Add Account.
(If it’s the first time you use Mail the wizard will open when you start the program.)

Click image for full version.

2-IMAP_Mac10.9-nytt2. Add an e-mail account

Start by choosing Add another email account > Continue.

Click image for full version.


3-IMAP-epost3. Enter email address and password

Full name, username/email address and password > Login.


4. Enter email address and password

Fill in the e-mail address and mail server again as shown in the image > Log in.
Mail server: m.work2go.net

5. Specify which functions you want to use

Select which functions you want to use > Done

7-IMAP_Mac10.9-kontoinfoAdjust the settings

To see more settings, go to Mail > Settings at the top of the menu bar of the program. Select your new Work2Go IMAP account so that it is highlighted in blue and the account’s settings are displayed on the right.

Click image for full version.

8-IMAP_Mac10.9-smtp-listaServer, outgoing e-mail (SMTP)

Click the arrows to open the drop-down menu.
Select Edit SMTP Server List.

Click image for full version.


10-IMAP_Mac10.9-serverUTpasswoClick Advanced.
Use custom port: 465 (alt. 587).
Use SSL.
Authentication: select Password from the drop-down menu.
Enter your username/email address and password.
Click OK to save the settings.

Click image for full version.

12-IMAP_Mac10.9-serverINportServer, incoming e-mail

Click Advanced at the top.
Server port: 993.
Use SSL.
Authentication: select Password from the drop-down menu.

Click image for full version.

When you close the box by clicking the red circle in the top corner, you will be asked if you want to save the changes you have made to the account. Click Save.

Add an e-mail account in Outlook

Follow our step by step guide of how to create an account to read and send e-mails from your computer. Do you already know how, click the box below for account settings.

This guide shows you how to add a new account in Outlook 2013.
If you have another version of Outlook, see Add Account in other versions of Outlook at the bottom of the page.

outlook-2013-11. Open the program

Go to File > Add Account.
Click Configure server settings manually > Next.
Choose Internet E-mail > Next.

Click image for full version.

2. Add your account settings

outlook-2013-2Your name: the name you want to use as the sender.
E-mail address: Your e-mail address.

Account Type: select IMAP.
Server incoming mail: m.work2go.net
Server outgoing e-mail: m.work2go.net

Username: your email address.
Password: your password for your Work2Go account.
NOTE! Requires the Secure Password Authentication (SPA) should NOT be selected!
Click More Settings.

Click image for full version.

3. Adjust the settings

outlook-2013-3Outgoing serverselect outgoing server requires authentication.
Advanced – Incoming server (IMAP): 993 and SSL.
Outgoing server (SMTP): 465 and SSL.
Click OK > Next.
Then click Close > Finish.

Click image for full version.


For older versions of Outlook

In older versions there are different ways to reach Step 2 Add your account settings.

Outlook 2010

  1. Start the program.
  2. Go to File > Info> Account Settings.
  3. In the E-mail tab, select New.
  4. Choose to configure server settings manually.
  5. Then click Next > Internet E-mail > Next.
  6. Continue with step 2 Add your account settings.

Outlook 2007

  1. Start the program.
  2. Go to Tools > Account Settings.
  3. Select Microsoft Exchange, POP3, IMAP or HTTP > Next.
  4. Choose to configure server settings manually > Next.
  5. Continue with step 2 Add your account settings.

Äldre versioner av Outlook och Outlook Express

  1. Start the program.
  2. Go to Tools > E-mail account (Accounts in Outlook Express).
  3. Select Add a new e-mail account > Next.
  4. Select server type IMAP.
  5. Continue with step 2 Add your account settings.

Add an e-mail account in ZD Work2Go Mail

Follow our step by step guide of how to create an account to read and send e-mails from your computer. Do you already know how, click the box below for account settings.

add_accouuntZimbra11. Start ZD Work2Go Mail> Add new account at the bottom right.

Click image for full version.


ZimbraDesktop12. Select account type: Zimbra.

Click image for full version.


ZimbraDesktop23. Add your account settings.

Account Name: The name that appears as the sender.
Email address: Your e-mail address.
Password: password.
Incoming mail server: m.work2go.net
Port: 443
Security SSL.

Finish by clicking Confirm > Save.


Click image for full version.


Add an e-mail account in Thunderbird

Follow our step by step guide of how to create an account to read and send e-mails from your computer. Do you already know how, click the box below for account settings.

Thunderbird_11. Open the program

Start Thunderbird and then click Tools > Account Settings.
Under Account Actions, select Add e-mail account.

Click image for full version.

Thunderbird_22. Add your account settings

Enter your name, e-mail address and password.
Tick the box to save the password.
Click Continue > Manual Setup.

Click image for full version.

3. Adjust the settings

Thunderbird_3Username: your email address (the one you use to log in)
Incoming: IMAP | m.work2go.net | 993 | SSL / TLS | Password
Outgoing SMTP | m.work2go.net | 465 | SSL / TSL | Password

Click Test again to verify that you have entered the correct settings.
Click Create Account.

Click image for full version.


How filters can be used to simplify your day

Using e-mail filters increases the efficiency of your work. Here we tell you how filters can help you to manage all your messages.

You can create filters based on a number of different rules to get your messages sorted in different folders and gain control of the information flow, which in turn gives you more time for other work.

You can easily have them active periodically by a click.

Filter for incoming messages

  • Sort messages into folders based on conditions such as email address, subject, size, date, content, attachments and Calendar invitation.
  • Use multiple conditions for one and the same filter.
  • Automatically tag messages with tags, a flag or as read.
  • Move incoming messages to a specific folder.
  • Forward a message to another address.
  • Discard a message. Which means that the message will not reach your mailbox at all.

Filter for outgoing messages

  • Sort outgoing messages from the sent folder to another specified folder.
  • Mark e-mails with a tag.
  • Forward outgoing messages to another e-mail address.

NOTE! After creating a filter you can run the filter through your inbox. The only thing you need to do is select the filter and then click Run filters.