Archive | More questions
Fonts supported in Work2Go
When you want to use special fonts, it is important to remember that if the recipient does not have the same font on their computer, they may read the text of one of the fonts available on their computer instead. If you want to use a more unusual font we recommend that you make it into a PDF instead.
Find your way around in the HTML standard version
All features available in the Advanced (Ajax) version is not supportedwhen you log in with HTML standard version. Here is more information.
Features such as drag and drop, creating a meeting by clicking on the mini calendar in the left column, right-click to get the option to move, change properties, delete etc. does not function in the HTML Standard version. But you can still perform multiple selections in HTML standard, only a little different from what you are used to. Here are some examples.
- Change the properties for a folder / tag / calendar / address book, etc. > click edit.
- Move an e–mail message, select the message > Move to.
- Deleting a file, select the file> Delete.
Can’t save user name and password
Try these steps to resolve the issue.
If your browser won’t save your user name and password, even though you have ticked the box “Remember me on this computer” when logging in, you may need to verify that your browser allows you to save data. Although Work2Go is set to save your user name and password, the browser has the final say.
Firefox
- Tools > Preferences
- Security
- Verify that “Remember Password” is checked.
Internet Explorer
- Tools > Internet Options
- Content tab > Settings
Here you set if your browser should save your user name and password.
Safari
- Safari > Settings (mac)
- Edit > Settings (windows)
- AutoFill > AutoFill Web forms tick the option User Name and Password
Google Chrome
- Click on the three lines in the upper right corner (Customize and control Chrome) and you will see a menu.
- Select Settings.
- Click Show advanced settings … at the bottom of the list.
- In the Password and Form check the box to “save passwords …”
Show the Content
If your login details still aren’t saved in your browser, even though you checked the ‘Remember me on this computer “, and you have set your browser to save usernames and passwords for web sites, you can solve this issue by creating a bookmark / favorite.
- Create a bookmark / favorite with the URL-address like this: https://www.work2go.net/?username= name@yourdomain.com Change “name@yourdomain.com” to your e-mail address.
- You can even include your password in the URL to also get the password saved: https://www.work2go.net/?username= name@yourdomain.com&password=yourPassword
Change “name@yourdomain.com” again and “yourPassword” to your Work2Go password.
NOTE! We do not recommend our users to save their password in the URL since it involves unnecessary security risks!
Empty cache and cookies
If a Web page does not display its content correctly in your browser, you can try to empty cache and cookies and restart the browser to resolve the issue.
Clear history in your browser
Internet Explorer
Ctrl + Shift + Delete
Firefox
Windows: Ctrl + Shift + Delete
Macintosh: Command + Shift + Delete
Safari
Windows: Ctrl + Alt + E
Macintosh: Command + Alt + E
Google Chrome
Windows: Ctrl + Shift + Delete
Macintosh: Command + Shift + Delete
Each browser stores information from your visited websites, such as images and other downloaded elements. It is stored in the browser’s cache and is useful when you return to the website, since the browser won’t need to download the elements again. However this can also cause the browser to function slower. Emptying the cache occasionally improves the speed and performance of the browser significantly.
What is cookies?
A cookie is a small file which a website creates and puts on your computer. Cookies are normally just a helpful and safe file. When you visit a website that uses cookies, it sends out a question to your browser to see if the cookie is already saved. Next time you visit the site (if you chose to save cookies of course), your browser will send back the cookies that belongs to that site. Cookies inform the website who you are and in return it displays information that is appropriate for you. Cookies store information that identifies you. Information such as your name and email address. A website has only access to the information you provide. For example, a website can never know your email address unless you provide it. A website may never have access to other information on your computer than what you have specified yourself.
WebEx zimlet
WebEx zimlet is an add-on to Work2Go that allows you to list your upcoming WebEx meetings as well as keep one or join one with just one click.
 You no longer need to open WebEx to schedule a meeting – this is already done for you. The meeting will also be added to your Work2Go calendar when you send out the invitations.
- Drag and drop contacts and meetings to create new WebEx meeting.
- Right-click WebEx in the Zimlets overview window, in the lower left corner of your browser, to manage your WebEx account and meetings.
- Create a WebEx meeting when you create an appointment in your calendar.
- Drag and drop contacts and email messages to create a new WebEx meeting, with the contacts.
- Drag and drop a meeting to create a new WebEx meeting with the same participants.
Help! my account is almost full
Here are tips on how you can save space on your account.
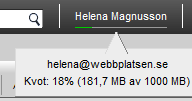 Sometimes you can save too much unnecessarily and after a while it exceeds its quotas. The current use of the quota you will see in the top right corner and if you hover over your name you get a detailed description.
If you exceed your quota, following may occur
- You will receive an email informing you of your quota.
- You will be informed of your quota when logging in.
- Email sent to you may be returned back to the sender with a message
informing your mailbox is full.
You can delete in different ways
- Mark what you want to delete and choose Delete from the toolbar.
- Mark what you want to delete and press the Delete key.
- Right-click on what you want to delete and choose Delete from the menu.
- Drag and drop it to the Recycle Bin in the left column.
- Do you want to delete several at once, select them by holding down the Ctrl key or Shift–click to select multiple consecutive.
Here are some tips on how to reduce the size of your mailbox
- Delete old messages no longer needed.
- Delete large attachments. Save attachments locally if you want to keep them.
- Delete files you no longer need in your Briefcase or Document.
NOTE! If you save an email with an attachment to your Briefcase, a copy of the attachment will be saved twice in Work2Go. - Sometimes you don’t need to keep all messages in the Sent folder. You can easily save up space by deleting unnecessary messages here.
- Do not forget to empty the Trash!
Print a task list
You can make different kind of prints of your task lists.
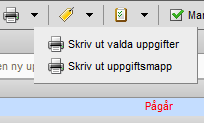 Select the data you want to print > Print selected data under the printer icon in the toolbar.
- Print the entire task list by selecting Print task folder.
- Click Print when you have opened any of your tasks information in edit mode.
Logging in with different versions
Get the best experiences of Work2Go by logging in with different versions as you use for a variety of devices and internet connections. Here we present the differences.
- Advanced (Ajax): is more user friendly than the Standard one and this it the one we recommend you to use. With the Ajax-based version you get more help, additional configuration options, drag and drop, export messages as zip file, extended search functionality, etc.
- Standard HTML: is recommended if your Internet connection is slow or if an older browser is used or simplified functionality is desired.
- Mobile: When you log into Work2Go on your mobile’s browser choose mobile mode. It is designed for mobile phones and displays your Mail, Address Book, Calendar and Briefcase. You are also able to perform searches in this mode.
At the Preferences tab > General > “Login Options”, you select what version you wish to log in by default, Advanced (Ajax) or Standard (HTML).
Create a screenshot
When you want to show someone else your screen (eg if you received an error message that you need help to interpret) a screenshot is always helpful.
 Windows 7/8
- Open the Snipping tool.
(Start > All programs > Extras > Snipping tool). - Click the arrow next to New and select the tool.
- Then pull out an area on your screen using your mouse to make the screenshot.
- Save the screenshot and attach it to an e-mail message.
Windows Vista/XP
There is a button on the computer keyboard called prt sc, print screen or something similar in the upper right corner. Usually after the F 12 key. By holding down the ALT key while pressing the Print Screen the screenshot will only contain of the current activated application window.
- Press prt sc/print screen (maybe even hold down ALT at the same time) and the screenshot is now saved as a clipboard.
- Open a new document in an image- or word processing software (such as Paint or Word) to paste your screenshot (Ctrl+V).
- Save or edit the screenshot and then attach it to an e-mail.
Mac OS
- Command + Shift + 3 – a screenshot of the entire screen.
- Command + Shift + 4 – hold down the mouse button and drag out a box to take a screenshot.
Share a task list
You can share your Task Lists with other people in your office, with external guests and with the public.
When sharing a Task List a copy of the original is placed in the other user’s left column and therefor one will not need to log in to the other person’s account to view it’s content.
1. Right-click the Task List > Share Task List.
2. The dialog box Share Properties opens.
3. Choose who you want to share the list with:
Internal users or groups
The user or group must have a valid email address in Work2Go. Assign them one of the following roles:
- None An option you use to temporarily disable access to a shared Task List without canceling the sharing. The Task List will still remain in the other person’s account, but they won’t be able to view its content.
- Viewer can read the content, but can’t make any changes to it.
- Manager has full permission to read and edit the content.
- Admin has full permissions to read, edit, add, delete, accept or decline invitations and administrate its content.
External guests
They can only read the content of the Task List, but can’t make any changes to it. Enter the email address of your guest and set a password.
Public
They can only read the content of the Task List and don’t need a password for it. Hand out the URL that appears in the box below. Right-click it and select Copy link to get hold of the full URL. Anyone who knows about the URL to this Task List will be able to see its content. No one can however make any changes to it.
4. In the Message area you choose which type of message to send. This message can be sent to both internal users and external guests.
5. Click OK when you’re done.
Tips on settings
The Preferences tab allows you to configure many of the different features in Work2Go. Here are some of them that we recommend.
General
- Set what version you want to log in with, we recommend Advanced for best functionality.
- Decide what theme you want to use for your account.
- Select appropriate language and time zone.
- Change your password.
- Select if the content of you Junk folder or Trash folder should be included in searches.
- Select the number of items to be fetched when you scroll. We recommend keeping the number at 50 by default. If your internet connection is slow you may notice some difference, otherwise not.
- Tick the box if you want to be able to select multiple items in a list at once.
Sharing
- List of folders that are shared with you, that you have not yet accepted.
- List of folders that are shared with you, which you have already accepted.
- List of folders you share with others. You can also change these folders properties such as permissions, revoke access privileges or resend an invitation of sharing.
- Set up a new sharing of a folder. Folders you can share are your Email folders, Address Book, Calendars, Tasks, Documents and Briefcase folders.
Import/export
You can easily import or export data from your account. Such as specific folders, Calendars and Contacts. The ability to export all of your account data is useful if you want to make a backup of your account (or of a specific folder) and save it on your computer or burn it onto a CD/DVD.
Shortcuts
Här finns samtliga kortkommandon som du kan använda dig av då du arbetar i Work2Go. Listan kan du även skriva ut. Listan kan du även få fram om du håller nere Ctrl+Q.
Zimlets
Zimlets are add-ons that improve the usability. You can choose to activate them or not here.
Create a task
Instructions about how you first create a task list and then a task that you save in your list.
1. Create a task list
 Click the gear at Tasks> New task list.
- Add a name for the list and choose a colour.
- The task list is now visible in the left column.
2. Add a task
 1. Click New task.
2. Fill in the details about the task.
Subject: The title.
Location: If the task should be performed on any specific location.
Priority: Set priority.
Task list: Select a list to save your task to.
3. Select the status and percentage. You change this as time goes.
4. Set start and end dates.
5. Uncheck the box if you want a reminder of this task, and fill in when you want to be reminded. Do you want a reminder to another email address, add it by clicking Configure.
6. Type in any notes in the box below.
7. Click Save at the top left when you are done.
Create a task from an e-mail
- Right-click the email and select Create Task from the menu.
- The content of the email will be added into the notes field in a new Task and now you fill in the rest of the settings so that it fits into your schedule.
Introduction to the task list
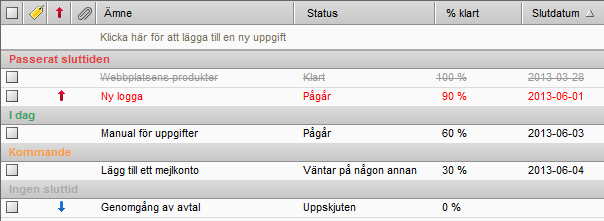
Tasks is a useful tool when you want to create to-do lists. Here we tell you more about what you can do with them.
When using Tasks you get a clear overview of all projects you’re currently working on and can easily keep track of the progress of each and every one separately. While you’re working on a project, you edit its progress and other useful information in the Task you’ve created.
- Add a start and end date, which can be changed afterwards.
- Specify the status of its development.
- Keep track of developments based on a percentage scale
- Select the priority (high, normal or low).
- Select one or more tags and sort them based on its percent or end date.
- Get reminder notes of tasks.
- Add notes, images, links, attachments, etc..
- Share with others.
Move one task to another task list
- Open the Task by double-clicking it and select another Task List in the section “Details”.
- Drag and drop a Task to another Task list in the left column.
- Right-click the Task > Move > select another Task List > OK.
Language settings
There are many different languages available for your Work2Go account.
You can change language at the Preferences tab > General: “Sign in Options”.
The language you select is also the language used while using the spell check.
Unfortunately there is no separate setting for the spell check.
Use tags and bring order to the account
Tags are similar to flags only a bit more advanced. You can create and apply multiple tags to one single file/object and thus classify the it under several categories at the same time.
Create a new tag
Tags can be created in several ways.
- Click the Tag symbol in the Toolbar > New Tag.
- Click the gear wheel or right-click on the title labels in the left column > New tag.
- Right click on an object and select Mark Message > New tag.
- If you have an item in the Content window that you want to highlight, you can also simply drag and drop already created labels (from the left menu) on the item in question.
Tag an object with one or multiple tags
If you assign an object multiple tags, it will be marked with a rainbow-colored tag instead. You can mark objects in several ways.
- Drag and drop a tag from the left column on to the item.
- Right-click an item > Mark the item with a tag > select a tag.
- Click the arrow next to the tag icon on the toolbar > select a tag.
Remove a tag
- Select the object > press the key U.
- Right-click the object > Tag > Remove tag.
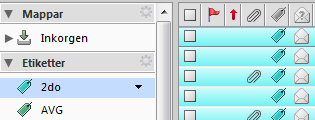 Get all selected items with one click
Click on the tag in the left column and all items marked with this tag are listed in the right window.
Set colour of messages according to tag colour
You can set tag selected e-mails appear more visible in your list of messages.
Preferences tab> Mail: Displaying messages: put a tick in the box next to Message Color.
Tags on shared folders
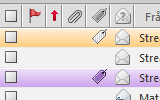 Tags can also be used on shared folders. When you have a folder shared to you where there are items marked with a tag, the tag will be visible. But if you haven’t created the sametag on your own account, you will see a gray and white striped tag instead. Hold your cursor over the tag to find out the tag’s name. If you have more than read access to the shared folder, you can mark objects in it with tags, even though it is not you who created the object.
Benefits of using Tags
- Easy to use to sort your emails.
- Search for messages with a certain tag and no matter what folder they’re in, they will be listed in the content window.
- Quickly find tagged items such as contacts, even though they are saved in different Address Books.
- Sort and keep track of various meetings that discuss the same subject/project. This functions best if you view your Calendar as a list.
- Use one tag for high priority and another one for medium priority.
- Create as many tags as you wish.
- Use multiple tags for one and the same email or contact.
Change password
You can change your password yourself. We will tell you how.
Go to Preferences > General to change your password.
- Click Change Password and enter your old password.
- Enter the new in New Password and once again to Confirm.
- Click Change Password.
Once you have changed your password, we can’t see the password on your account anymore. But if you forget your password, we can always reset it and give you a new one.
Make your own backup of your account
Read about how you easily can move information from one account to another or how to save your own backup.
We make backups of your account at regular intervals. So if something were to go wrong, we can always read it back to you. You can also make your own backup copy of your account if you wish. When you make an export of your account, all the data will be saved in a compressed file, a tar-gzipped (.tgz) file, which you can save to your hard drive, for example. When you make an export a copy of the data will be created. Nothing will disappear from your account. You can import the file back to your account again at a later time.
- Preferences > Import/Export.
If you want to IMPORT you find your file by clicking the Browse button.
If you want to EXPORT you select correct Type and Source. - Checking the box by Advanced Settings gives you the option to select a specific folder to export.
- You can also set a time interval and only export attachments.
Save a search query
If you perform a search you think you will want to use again, you can save it.
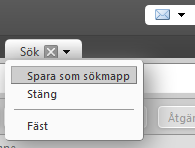 Create the search query.
- In the Search tab click the arrow for the menu and select Save as Search Folder.
- Enter a name for the search.
- Select a colour for the search.
- Click OK. The search is now in the left column.
If you want to use a saved search, click the search folder in the navigation pane on the left. The search results are displayed immediately in the contents pane.
Import / export information
You can import or export files, folders, e-mails, calendar or contacts on the Preferences tab on your account.
All account data is exported to .tgz format, which can also be imported back into the system again. An exported calendar gives you an .ics file, contacts a .csv file.
- Preferences > Import/Export.
If you want to IMPORT you find your file by clicking the Browse button.
If you want to EXPORT you select correct Type and Source. - Checking the box by Advanced Settings gives you the option to select a specific folder to export.
- You can also set a time interval and only export attachments.
If you don’t have a program installed on your computer to unzip files already, we recommend you to download 7-Zip for Windows or StuffIt on your Mac. They are both free to use.
7-zip: http://www.7-zip.org/
StuffIt: http://www.stuffit.com/


