Archive | More features

WebEx zimlet

WebEx zimlet is an add-on to Work2Go that allows you to list your upcoming WebEx meetings as well as keep one or join one with just one click.

webex
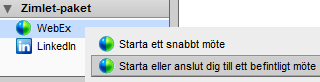
You no longer need to open WebEx to schedule a meeting – this is already done for you. The meeting will also be added to your Work2Go calendar when you send out the invitations.

  • Drag and drop contacts and meetings to create new WebEx meeting.
  • Right-click WebEx in the Zimlets overview window, in the lower left corner of your browser, to manage your WebEx account and meetings.
  • Create a WebEx meeting when you create an appointment in your calendar.
  • Drag and drop contacts and email messages to create a new WebEx meeting, with the contacts.
  • Drag and drop a meeting to create a new WebEx meeting with the same participants.

Print a task list

You can make different kind of prints of your task lists.
  • 7_lista_utskrift
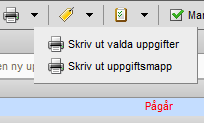
Select the data you want to print > Print selected data under the printer icon in the toolbar.
  • Print the entire task list by selecting Print task folder.
  • Click Print when you have opened any of your tasks information in edit mode.

Share a task list

You can share your Task Lists with other people in your office, with external guests and with the public.

When sharing a Task List a copy of the original is placed in the other user’s left column and therefor one will not need to log in to the other person’s account to view it’s content.

1. Right-click the Task List > Share Task List.
2. The dialog box Share Properties opens.
3. Choose who you want to share the list with:

Internal users or groups
The user or group must have a valid email address in Work2Go. Assign them one of the following roles:

  • None An option you use to temporarily disable access to a shared Task List without canceling the sharing. The Task List will still remain in the other person’s account, but they won’t be able to view its content.
  • Viewer can read the content, but can’t make any changes to it.
  • Manager has full permission to read and edit the content.
  • Admin has full permissions to read, edit, add, delete, accept or decline invitations and administrate its content.

External guests
They can only read the content of the Task List, but can’t make any changes to it. Enter the email address of your guest and set a password.

Public
They can only read the content of the Task List and don’t need a password for it. Hand out the URL that appears in the box below. Right-click it and select Copy link to get hold of the full URL. Anyone who knows about the URL to this Task List will be able to see its content. No one can however make any changes to it.

4. In the Message area you choose which type of message to send. This message can be sent to both internal users and external guests.
5. Click OK when you’re done.

Create a task

Instructions about how you first create a task list and then a task that you save in your list.

1. Create a task list

  1. uppgiftslistaClick the gear at Tasks> New task list.
  2. Add a name for the list and choose a colour.
  3. The task list is now visible in the left column.

2. Add a task

uppgift1. Click New task.
2. Fill in the details about the task.

Subject: The title.
Location: If the task should be performed on any specific location.
Priority: Set priority.
Task list: Select a list to save your task to.

3. Select the status and percentage. You change this as time goes.
4. Set start and end dates.
5. Uncheck the box if you want a reminder of this task, and fill in when you want to be reminded. Do you want a reminder to another email address, add it by clicking Configure.
6. Type in any notes in the box below.
7. Click Save at the top left when you are done.

Create a task from an e-mail

  1. Right-click the email and select Create Task from the menu.
  2. The content of the email will be added into the notes field in a new Task and now you fill in the rest of the settings so that it fits into your schedule.

Introduction to the task list

Tasks is a useful tool when you want to create to-do lists. Here we tell you more about what you can do with them.

7_uppgifter

When using Tasks you get a clear overview of all projects you’re currently working on and can easily keep track of the progress of each and every one separately. While you’re working on a project, you edit its progress and other useful information in the Task you’ve created.

  • Add a start and end date, which can be changed afterwards.
  • Specify the status of its development.
  • Keep track of developments based on a percentage scale
  • Select the priority (high, normal or low).
  • Select one or more tags and sort them based on its percent or end date.
  • Get reminder notes of tasks.
  • Add notes, images, links, attachments, etc..
  • Share with others.

Move one task to another task list

  • Open the Task by double-clicking it and select another Task List in the section “Details”.
  • Drag and drop a Task to another Task list in the left column.
  • Right-click the Task > Move > select another Task List > OK.

Make your own backup of your account

Read about how you easily can move information from one account to another or how to save your own backup.

We make backups of your account at regular intervals. So if something were to go wrong, we can always read it back to you. You can also make your own backup copy of your account if you wish. When you make an export of your account, all the data will be saved in a compressed file, a tar-gzipped (.tgz) file, which you can save to your hard drive, for example. When you make an export a copy of the data will be created. Nothing will disappear from your account. You can import the file back to your account again at a later time.

  1. Preferences > Import/Export.
    If you want to IMPORT you find your file by clicking the Browse button.
    If you want to EXPORT you select correct Type and Source.
  2. Checking the box by Advanced Settings gives you the option to select a specific folder to export.
  3. You can also set a time interval and only export attachments.

Import / export information

You can import or export files, folders, e-mails, calendar or contacts on the Preferences tab on your account.

All account data is exported to .tgz format, which can also be imported back into the system again. An exported calendar gives you an .ics file, contacts a .csv file.

  1. Preferences > Import/Export.
    If you want to IMPORT you find your file by clicking the Browse button.
    If you want to EXPORT you select correct Type and Source.
  2. Checking the box by Advanced Settings gives you the option to select a specific folder to export.
  3. You can also set a time interval and only export attachments.

If you don’t have a program installed on your computer to unzip files already, we recommend you to download 7-Zip for Windows or StuffIt on your Mac. They are both free to use.

7-zip: http://www.7-zip.org/
StuffIt: http://www.stuffit.com/

Cancel / change permissions for a shared folder

The settings for shared folders can be changed, the changes can be made of the owner of the folder and anyone with administrator rights to the folder.

Cancel a sharing of a folder

You can cancel a share by right-clicking the folder, select Edit Properties and in the Folder Properties click Remove. Users can no longer access the contents of your folder, it’s now empty.They need to delete it from their account themselves though.

Change permissions for a shared folder

If you want to change permissions, select Edit instead. This opens a window where you can perform the desired change and then click OK. Choose whether you want a message to be sent informing about the change or not.


Accepting an invitation to shared items

Someone wants to share information on their account to you. Here you can learn how to accept such an invitation.

accept

If you receive an email with an invitation to share another person’s folder and accept it by clicking Accept Share a dialog box will open up.

Here you can rename the folder and select what color it should have. You can also choose to send a reply message that you have accepted. When you click Yes, a copy of the folder will be placed in the left column in your account and the e-mail message will automatically be moved to the Trash. You can change name and color again at a later stage if you right-click the folder and select Edit Properties.

Accepting a sharing in your accounts preferences

If you haven’t received an invitation via email or misplaced it, you can still accept the sharing at the preferences tab > Sharing. Enter the person’s e-mail address and click Search in the top box “Folders shared with me, but I have not accepted yet.” Accept the share in the list of search results.

acceptera_delning