Archive | Support EN

Create a task

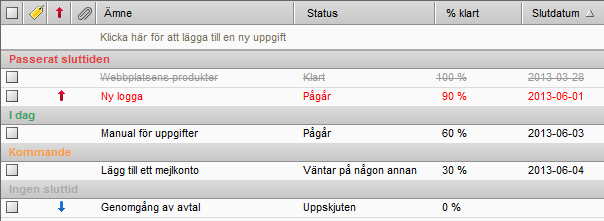
Instructions about how you first create a task list and then a task that you save in your list.

1. Create a task list

  1. uppgiftslistaClick the gear at Tasks> New task list.
  2. Add a name for the list and choose a colour.
  3. The task list is now visible in the left column.

2. Add a task

uppgift1. Click New task.
2. Fill in the details about the task.

Subject: The title.
Location: If the task should be performed on any specific location.
Priority: Set priority.
Task list: Select a list to save your task to.

3. Select the status and percentage. You change this as time goes.
4. Set start and end dates.
5. Uncheck the box if you want a reminder of this task, and fill in when you want to be reminded. Do you want a reminder to another email address, add it by clicking Configure.
6. Type in any notes in the box below.
7. Click Save at the top left when you are done.

Create a task from an e-mail

  1. Right-click the email and select Create Task from the menu.
  2. The content of the email will be added into the notes field in a new Task and now you fill in the rest of the settings so that it fits into your schedule.

Use different roles for different assignments

Here we explain how you can send e-mails from a different addresses even if you are still logged in to your own account.

roll

It’s useful to create different personas (roles) if you sometimes want to send business e-mails from your company (info@yourdomain.com) and at other times private e-mails from you (name@yourdomain.com).

  1. Go to Preferences > Accounts.
  2. Click Add Persona.
  3. Fill in your information under “Persona Settings”.
    Persona name, this is what you will see when you choose which persona you want to send your email from in the toolbar. You won’t see this name in the actual e-mail when you send it.
  4. Type in the name you want to appear in the “From” field of outgoing emails.
    Select what email address you want to send emails from.
    NOTE! E-mail address must be registered in Work2Go, either as an account or as an additional email address/alias.
  5. If you want the recipient to respond to another email address instead, tick the box next to “Reply-to” and select an email address from your list.
  6. Select a signature for the persona. If you haven’t already created one you can add it later. If you don’t want a signature added automatically, select “Do not attach signature”.
  7. Decide if you always want to select this persona automatically when replying e-mails  sent to the specified email address or when you get a response to a particular folder.
  8. Click Save at the top left corner when you are finished.

Introduction to the task list

Tasks is a useful tool when you want to create to-do lists. Here we tell you more about what you can do with them.

7_uppgifter

When using Tasks you get a clear overview of all projects you’re currently working on and can easily keep track of the progress of each and every one separately. While you’re working on a project, you edit its progress and other useful information in the Task you’ve created.

  • Add a start and end date, which can be changed afterwards.
  • Specify the status of its development.
  • Keep track of developments based on a percentage scale
  • Select the priority (high, normal or low).
  • Select one or more tags and sort them based on its percent or end date.
  • Get reminder notes of tasks.
  • Add notes, images, links, attachments, etc..
  • Share with others.

Move one task to another task list

  • Open the Task by double-clicking it and select another Task List in the section “Details”.
  • Drag and drop a Task to another Task list in the left column.
  • Right-click the Task > Move > select another Task List > OK.

Add account for e-mails, contacts and calendar in Windows Phone [PRO]

This guide shows you how to add an account to manage e-mail, contacts and calendar on an Windows Phone.

This requires Work2Go Pro

If you don’t have Pro today, you can upgrade by contacting our support.
Not interested of upgrading? Follow the guide Add e-mail account in… instead.

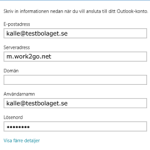
  1. exchange_win8Click settings > E-mail > Add account > Outlook.
  2. Fill in your e-mail address.
  3. Server address: m.work2go.net
    Domain – Leave this box empty!
  4. User name: your e-mail address (e-mail address that you use when you log into your account in a browser).
  5. Password: your password.
  6. Click connect.

Click image for full version.

If it doesn’t work

  • Test your username and password on www.work2go.net.
  • Check all the settings in your phone again.
  • Are you unsure if you have Work2Go Pro or not? Contact our support.

Use tags and bring order to the account

Tags are similar to flags only a bit more advanced. You can create and apply multiple tags to one single file/object and thus classify the it under several categories at the same time.

Create a new tag

ny_etikett

Tags can be created in several ways.

  • Click the Tag symbol in the Toolbar > New Tag.
  • Click the gear wheel or right-click on the title labels in the left column > New tag.
  • Right click on an object and select Mark Message > New tag.
  • If you have an item in the Content window that you want to highlight, you can also simply drag and drop already created labels (from the left menu) on the item in question.

Tag an object with one or multiple tags

If you assign an object multiple tags, it will be marked with a rainbow-colored tag instead. You can mark objects in several ways.

  • Drag and drop a tag from the left column on to the item.
  • Right-click an item > Mark the item with a tag > select a tag.
  • Click the arrow next to the tag icon on the toolbar > select a tag.

Remove a tag

  • Select the object > press the key U.
  • Right-click the object > Tag > Remove tag.

find_etGet all selected items with one click

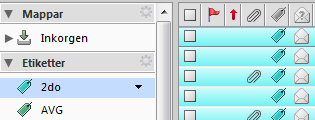
Click on the tag in the left column and all items marked with this tag are listed in the right window.

Set colour of messages according to tag colour

tydligare-e

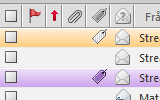
You can set tag selected e-mails appear more visible in your list of messages.
Preferences tab> Mail: Displaying messages: put a tick in the box next
to Message Color.

Tags on shared folders

delad-etikettTags can also be used on shared folders. When you have a folder shared to you where there are items marked with a tag, the tag will be visible. But if you haven’t created the sametag on your own account, you will see a gray and white striped tag instead. Hold your cursor over the tag to find out the tag’s name. If you have more than read access to the shared folder, you can mark objects in it with tags, even though it is not you who created the object.

Benefits of using Tags

  • Easy to use to sort your emails.
  • Search for messages with a certain tag and no matter what folder they’re in, they will be listed in the content window.
  • Quickly find tagged items such as contacts, even though they are saved in different Address Books.
  • Sort and keep track of various meetings that discuss the same subject/project. This functions best if you view your Calendar as a list.
  • Use one tag for high priority and another one for medium priority.
  • Create as many tags as you wish.
  • Use multiple tags for one and the same email or contact.

Can’t send or receive e-mails in Windows Phone

Got an error message when setting up an IMAP account in your Windows Phone? Then you need to check the settings.

1. Are you using the correct username and password?

Test your username and password by signing in on: https://www.work2go.net/

2. Control all settings in your mobile

On the home screen, click the three dots (…) > Settings > Email + accounts > Account.

  • Type in your password again.
  • Server for incoming mail: m.work2go.net:993
  • Do you use IMAP4 account type? – If not, change it.
  • Outgoing mail (SMTP): m.work2go.net:465
  • The server requires authentication should be selected.
  • Use the same username and password for sending should be selected.
  • Use SSL for incoming e-mail should be selected.
  • Use SSL for outgoing e-mail should be selected.


If it still doesn’t work

Change to security type None, for both incoming and outgoing server.
Preferences > Your account > Server settings

Incoming server settings > Security type: None > Server port: 143.
Outgoing server settings > Security type: None > Server port: 2525.

Create more e-mail addresses / aliases [ADMIN]

You can have an endless number of email addresses linked to your account as aliases. Log in as administrator and add them as aliases.

alias11. Login on your admin account.
All customers/domains have at least one administrator account and usually it’s the e-mail address admin@yourdomain.com

2. Click the arrow next to the account name in the top right corner to select the Admin Console and log into the admin interface (same login as the account that you are already logged in).

alias2

3. Click Manage in the left column and then Alias.

alias3

4. Click the gear in the top right corner > New.

5. Enter the new e-mail address you want to create, for example info@yourdomain.com and then the e-mail address of the account that messages should be directed to (eg your e-mail address) > OK.

Alias is useful to create if your name in your e-mail address have differrent but common spelling variations. For example, your name is John Johnston and your e-mail address is john.johnston@yourdomain.com, it could be useful to create following aliases jon.johnston@yourdomain.com, jon.jonston@yourdomain.com and john.jonston@yourdomain.com

Dynamic email aliases

Work2Go also gives you the possibility to create dynamic aliases. You can write “+text” after the first part of the e-mail address, eg “anna+important@yourdomain.com”. The message will then be sent to the inbox of “anna@yourdomain.com”. If you then have a filter containing “+important” such message will be moved to a particular folder when they are received.


Make your own backup of your account

Read about how you easily can move information from one account to another or how to save your own backup.

We make backups of your account at regular intervals. So if something were to go wrong, we can always read it back to you. You can also make your own backup copy of your account if you wish. When you make an export of your account, all the data will be saved in a compressed file, a tar-gzipped (.tgz) file, which you can save to your hard drive, for example. When you make an export a copy of the data will be created. Nothing will disappear from your account. You can import the file back to your account again at a later time.

  1. Preferences > Import/Export.
    If you want to IMPORT you find your file by clicking the Browse button.
    If you want to EXPORT you select correct Type and Source.
  2. Checking the box by Advanced Settings gives you the option to select a specific folder to export.
  3. You can also set a time interval and only export attachments.

Add an e-mail account to Windows Phone

This guide shows you how to add an account for reading and sending e-mails in an Windows Phone. Do you already know how to do this? Click on the box below for the account settings.

1. Create the account

win_mob_IMAP_2g

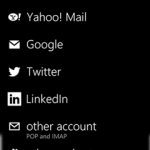
  1. Go to Preferences > Mail > Add Account > Advanced.
  2. Enter your e-mail address and password and press Next.
  3. Press Internet e-mail.

Click image for full version.

win_mob_IMAP_5d2. Add your account settings

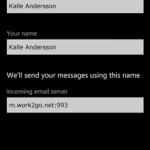
  1. Name of your account (only visible to you).
  2. Enter the name you want e-mails to be sent from.
  3. Server for incoming e-mails: m.work2go.net:993

Click image for full version.

win_mob_IMAP_6c3. Select the account type IMAP

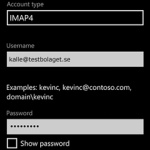
  1. Fill in the account IMAP4.
  2. Username: your e-mail address (e-mail address that you use when you log into your account in a browser).
  3. Password: password.

Click image for full version.

4. Adjust the settings

win_mob_IMAP_7b

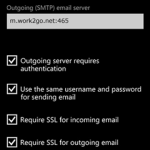
  1. Outgoing e-mail (SMTP): m.work2go.net:465
  2. Place a check by My server requires authentication.
  3. Use the same username and password to send.
  4. Use SSL for incoming e-mail.
  5. Use SSL for outgoing e-mail.
  6. Log into your account.

Click image for full version.

If it doesn’t work

Test your username and password on www.work2go.net and check all the settings in your phone again. Read more in Can not send or receive e-mails

Create a signature

A signature usually includes your name, contact details and other informative text. If you format it with HTML, you can also add pictures and link to a website.

You can create multiple signatures in your account. It can for instance be useful to create a more formal signature when you send e-mails to your customers and another for when you send to your friends.

When writing your message, select the signature to be used by clicking Options and Signature in the e-mail message toolbar. If you create multiple e-mail identities (roles), you can create a different signature to use for each different role.

skapa-signatur_w2g8

  1. Go to Preferences > Signatures and click New signature.
  2. Give the signature a descriptive name (especially important when you create multiple signatures).
  3. Select Format as HTML.
    (Format as plain text means that you can just fill in the text, no sign, image, etc.).
  4. Then create the actual signature in the box below.
  5. To add a logo put the cursor where it should be and click Insert image (icon with a picture of a tree). Click Browse to pick the image file from your computer.
  6. Select the signature to be used automatically when you write new messages or / and respond / forward from a particular sender / role.
  7. Determine whether the signature should be placed above or below the included messages.
  8. Click Save at the top left corner when you finish.

Create a signature from an HTML file

  1. Go to Preferences > Signatures and click New signature > Format as HTML.
  2. Open your HTML file in a browser.
  3. Select the text and copy.
  4. Paste it in the box for signature in Work2Go.
  5. Make any corrections.
  6. Place the cursor where the image should be and click on Insert image (icon with a picture of a tree) Click Browse to pick the image file from your computer.
    NOTE! If the HTML code for the image came with when you copied from the HTML file, you will see a broken link when you click on the icon to insert the image. Erase box and add the image file again.
  7. Click Save in the upper left corner.

Save a search query

If you perform a search you think you will want to use again, you can save it.
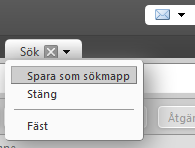
  1. spara_sokCreate the search query.
  2. In the Search tab click the arrow for the menu and select Save as Search Folder.
  3. Enter a name for the search.
  4. Select a colour for the search.
  5. Click OK. The search is now in the left column.

If you want to use a saved search, click the search folder in the navigation pane on the left. The search results are displayed immediately in the contents pane.

Import / export information

You can import or export files, folders, e-mails, calendar or contacts on the Preferences tab on your account.

All account data is exported to .tgz format, which can also be imported back into the system again. An exported calendar gives you an .ics file, contacts a .csv file.

  1. Preferences > Import/Export.
    If you want to IMPORT you find your file by clicking the Browse button.
    If you want to EXPORT you select correct Type and Source.
  2. Checking the box by Advanced Settings gives you the option to select a specific folder to export.
  3. You can also set a time interval and only export attachments.

If you don’t have a program installed on your computer to unzip files already, we recommend you to download 7-Zip for Windows or StuffIt on your Mac. They are both free to use.

7-zip: http://www.7-zip.org/
StuffIt: http://www.stuffit.com/

Search and find what you’re looking for

The search feature is a powerful tool that you can use for your entire account. It also searches in shared folders.

Before you start searching, we want to advise you to check your settings in your account. Go to Preferences > General > Do not have a marker in the box for Show advanced search language in search toolbar. However it might be smart to have markers in the boxes to include trash and shared objects in searches.

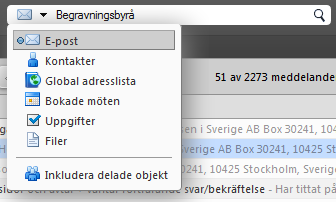
  1. w2g8_enkel-sokType what you’re looking for in the search field.
  2. Select one of the options in the menu and press ENTER / click on the magnifying glass. E-mail is set as default.
  3. The search results are now presented in a new tab.
  4. If you get too many results, you can filter the results based on a variety of criteria.

Conditions for searches

Click the terms AND, OR, NOT or () to add to the search.
For example, search for e-mails where the term “red flowers” are mentioned together, put parentheses around those two words. NOTE! AND is used implicitly between adjacent words.

Examples of how you can search

Search for Attachments

If you want to search for an attachment, but don’t remember if it was a jpeg or a pdf.
How it was done:

  1. Under rubriken Enkla filter sätter du en bock i rutan vid har en bilaga.
  2. Under the title Advanced Filter, click the arrow next to Attachments and select Adobe PDF and Image.

Searching for items marked with a tag

If you want to search for items containing information about new procedures for your company, which you have earlier tagged as Business News. How it was done:

  • Under the title Advanced Filter, click the arrow next to Tag and select the specific tag.

Search by a date range

If you want to search for emails created at a certain date or during a certain period. How it was done:

  • Under the title Advanced Filter, click the arrow next to Date sent and select dates by is before… and is after…

Search syntax

  • Searches you perform is always an exact search. You can search for phrases, but every word in this phrase is matched literally. Spelling variants are not allowed. For example, if you search the word bananas, messages with banana are not a match.
  • When searching for phone numbers, the whole number must be entered, only the area code does not work.
  • The asterisk * as a wild card after a prefix is supported. For example, if you are looking for do*, it return items with the words dog, door, etc.
  • Searches are not case sensitive.
  • Following special characters can not be used in your search text ~ ‘! @ # $% ^ & * () _-+? / () [], “

Cancel / change permissions for a shared folder

The settings for shared folders can be changed, the changes can be made of the owner of the folder and anyone with administrator rights to the folder.

Cancel a sharing of a folder

You can cancel a share by right-clicking the folder, select Edit Properties and in the Folder Properties click Remove. Users can no longer access the contents of your folder, it’s now empty.They need to delete it from their account themselves though.

Change permissions for a shared folder

If you want to change permissions, select Edit instead. This opens a window where you can perform the desired change and then click OK. Choose whether you want a message to be sent informing about the change or not.


Create an auto reply message

Here we show you how to create an auto reply message.

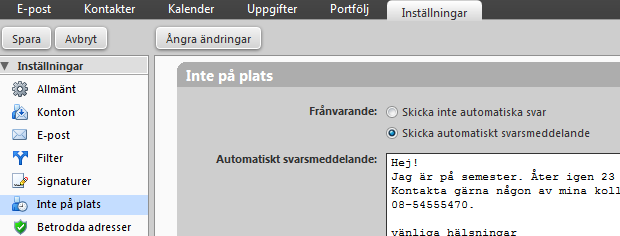
franvaromeddelande

Auto reply messages can be practical to use even when you’re at the office. You might have a lot to do, a tight deadline or something else when you simply don’t have time to take care of e-mail in a few days. Create a reply message saying you have received their message but your reply may take some time. Anyone who sends you a message will get a confirmation that you received the message directly and thus become less impatient with getting answers from you.

To create an auto reply message, go to Preferences > out of office.

  1. Click Send auto-reply message when you want to activate and/or create one.
  2. Enter the message in the auto-reply message box.
  3. Specify time period.
  4. Check the box Show free/busy in your calendar and choose between Out of office or Busy to be shown in your calendar during this period. By default only one away message will be sent per incoming sender/e-mail address during a seven days period. Contact us if you want it to be sent out more often.

Out of office messages

Here we show you how to create an out of office message.
You can have two different ones activated at the same time.

franvaromeddelande

To create an out of office message go to Preferences > out of office.

  1. Click Send auto-reply message when you want to activate and/or create one.
  2. Enter the message in the auto-reply message box.
  3. Specify time period.
  4. Check the box Show free/busy in your calendar and choose between Out of office or Busy to be shown in your calendar during this period. By default only one away message will be sent per incoming sender/e-mail address during a seven days period. Contact us if you want it to be sent out more often.

Send different reply messages at the same time

You can send two different kind of response messages at the same time.
One to your colleagues (and possibly also those saved in your address book) in the top box and another perhaps more formally in the second box. To activate the second message select the box by External Senders and choose who you want to send this message to.

  • Everyone who writes to you outside your workplace, from an e-mail address with a domain other than the one you use.
  • Select Anyone outside my domain except those in my contacts, if you want to send the more personal message to all your contacts and your colleagues, and the more formal message to external senders, the message in the box below.

Folders in Work2Go

Here you can read about how to use folders and what you can do with them.

Create a folder

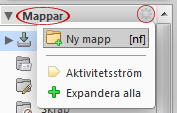
ny-mappYou can create new folders for your e-mails and in your briefcase in several ways.

  • Click the cogwheel on the right side of the title Folders.
  • Right-click the title Folders.
  • Right-click a folder > New Folder.

Give your folder a unique name

Same name of a folder located at the same hierarchical level (though in different section of Work2Go) is not allowed. A folder that you keep in the top level of the briefcase, may not have the same name as a folder located in the top level in your inbox, address book or calendar. However a folder that is on another level, can have the same name.

Edit a folder’s properties

When right-clicking a folder, you will be presented several options of what to do with the folder and its contents.

View a folder and its contents

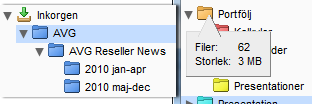
7_mapp_inneh

  • You can save your folders in a hierarchy. To see a folder’s sub folders, just click the arrow on the left side of the folder.
  • To see how many e-mails/files are kept in a folder, or just view it’s total size, hover the pointer over the folder for a while and a pop-up will give you the information.

Keep your folders sorted

Folders are sorted in alphabetical order. You can set the order yourself by numbering them (1, 2, 3…).
If you want different colors on your folders, right-click the folder and choose Edit Properties.

Moving Folders

  • In the left column where you see your folders, you can drag and drop them to the desired location.
  • If it is a shared folder, it is only the owner of the folder that can change its location. Files can however be moved, if you have the permission.
  • In your inbox you can also right-click the folder and choose Move.