Archive | Support EN
Contact all meeting participants
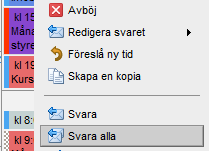 If you want to send a message to everyone who has been invited to a meeting, right-click the meeting in the Calendar > Reply to all.
A blank e–mail message with everyone’s e-mail addresses will open ready to send when you are finished.
Share your calendar with someone outside the office
How to share your calendar with others who do not have an account in Work2Go.
If someone outside your office wants to schedule a meeting with you and want to get suggestions on when it can suit you, you can create a link from your calendar and send it to the person.
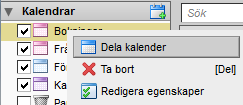
 Click the gear to the right of the title calendars.
- Select Submit link for free and busy as> HTML.
The link is placed in the message that you write clearly and send.
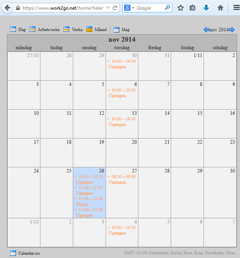
- The recipient clicks the link in your message, and your calendar is opened in a browser. Now the receiver can scroll back and forth and see at what times you’re already busy. It does not show what you have written in your calendar, only the text Busy (see picture).
Undo previous action
It is possible to cancel a misprint when one has just performed an action such as delete or move a contact. Just click on Undo at the top of the page.
Preferences for the calendar
Information about the different settings that you can do for your calendar on your account.
At Preferences > Calendar you decide how you want your Calendar to appear and how activities should be managed.
General
- Select the default view of your Calendar: monthly, weekly, daily, as a list or schedule.
- Set which day your week should start with.
- Decide if your appointments should be set as public or private by default. (You can always modify this when creating a new Calendar.) When you receive Calendar invitations, they are marked as public if you have chosen public here. When private is selected, invitations will be marked as private instead.
- Choose if you want your mini Calendar to be visible or not.
- Decide if the week number should be visible.
- Choose whether received invitations should be added to your Calendar automatically. If this option is selected, you can accept invitations from both e-mails and from your Calendar. If you haven’t selected this option you can only accept invitations by e-mail.
- Enable if you want to delegate your Calendar for an Apple iCal CalDAV client.
- Select whether e-mailed invitations should be removed when you have answered it.
- Forward invitation e-mails to another email address.
- How and when reminders for appointments should be displayed.
Work week and hours
- Set how your work usually looks like to simplify meeting bookings.
Creating Appointments
- Use the QuickAdd dialogue when creating new appointments. This is very useful if you create a lot of appointments that only include yourself.
- Show timezone list in appointment view, which makes it more clear for you when you schedule meetings with people in different time zones.
Permissions
You can only make settings for persons of the same organization (using the same domain in the e-mail address) as you. You can use the full email address or just the username of the / those you want to specify permissions.
- Set whether users should be allowed to see your free / busy time.
- Specify who can invite you to meetings, all or certain users.
- If you limit who can invite you, you can also choose to send an automatic reply message to let them know that they do not have permission to invite you.
Apple iCal
- Enable to be able to see a calendar in Apple iCal.
Move e-mails within an account
E-mails can be moved from your inbox and sorted into folders in different ways. Here we describe how.
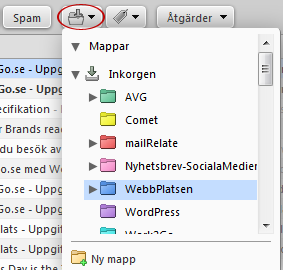 Drag and drop the desired folder.
- Select the message> press the M key> select folder.
- Right-click the message> Move> the folder.
- Click Move on the top toolbar> select the folder.
You can select multiple messages and move them at the same time, by putting a tick in the box in the list of all e-mails.
Use the keyboard key Shift + click to select multiple e-mail.
Move attachment from e-mail to your file archives
 Click on the briefcase at the top of the message window and select the folder to save the file.
You can also search for the folder or create a new folder.
NOTE! When you save an attached file to your briefcase, a copy of the fileis created. Delete the file in the e-mail so you save on your space on your account.
Spell Check
How you can use the spell checker on the account.
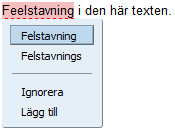 To check the spelling, click Check spelling symbol in e-mail message toolbar.
Misspelled words will be marked. If you click on the word, you get a drop-down menu of suggestions to choose from. You can also choose to Ignore the suggestions or Add the word you typed, even though the spell checker sees it as misspelled. The word will be highlighted again but this time in a different color.
![]() NOTE! Before you close the spell checker, you can change back the corrected word to the original spelling. Click on the highlighted word again and select the original spelling from the top of the list.
NOTE! Before you close the spell checker, you can change back the corrected word to the original spelling. Click on the highlighted word again and select the original spelling from the top of the list.
![]() When you are finished with the spell check, click Resume editing. To check the spelling again, you click Check again.
When you are finished with the spell check, click Resume editing. To check the spelling again, you click Check again.
![]() If you always want all your emails spell checked before sending them, you can activate “Mandatory spellcheck before sending a message” under Preferences > Mail > Composing: Composing Messages.
If you always want all your emails spell checked before sending them, you can activate “Mandatory spellcheck before sending a message” under Preferences > Mail > Composing: Composing Messages.
Why don’t I receive any e-mails?
Here we explain why you do not always get all e-mails that actually have been sent to you.
Work2Go includs a proper spam protection that include a stop frauds and other promotional messages from reaching your inbox. But when you send e-mails, it’s far from just Work2Gos spam protection that decides if a message should be delivered or not. When the e-mail is sent its delivery is controlled of various regulatory framework for spam protection, these also regulate according to a series of set rules for what is considered to be ok or not. The internet is originally a system that requires all participating online to behave nice and with good intentions, which in today’s modern society unfortunately exploited.
- message formats,
- its contents, or
- its attachments.
- It can be from a supplier that has become blacklisted
(because the former has sent out tons of spam).
- Your inbox is already full.
- The sender has misspelled your email address.
Why won’t my message reach the destination?
Sometimes it happens that a message bounces, which means it can not be delivered for some reason. Here we mention some examples of the most common causes.
- The recipient does not have a valid e-mail address.
- Recipient’s e-mail system rejects the message for one reason or another.
- The recipient’s mailbox is full.
If your e-mail is rejected by the recipient’s e-mail system, you will receive a message. This usually contains the following information.
- At least part of the contents of your original message.
- Some system-generated error messages that give more information about why the e-mail was bounced.
Do not be disturbed every time you receive new e-mail
There are settings you can change, indicating how you find out that you have new email messages.
If you receive many e-mails in your inbox and are easily disturbed by the sound / blinking browser / message box is displayed for incoming messages, you should change the settings for receiving messages.
- Go to the Preferences tab> Mail > Receiving messages.
- Correct the settings for message arrival.
- Click Save in the upper left corner.
Can’t send nor receive e-mail in Mac Mail
Are you not receiving emails on your computer? Or you can not send? Go through the following steps to check the settings.
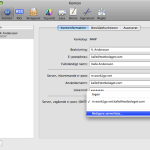 1. Check your account settings
- Go to Mail > Settings > Account > Account information.
- Click Edit Server List.
- You can find “Server Outgoing mail (SMTP)” at the bottom of the Account Information page.
Click image for full version.
2. Delete any duplicate e-mail server
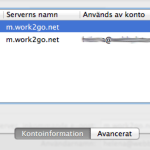 If it looks like the image, i.e. a line that only says m.work2go.net but without an email address. Click on that row (without an email address) so that it becomes highlighted, and then on the (-) minus sign down in the left corner to delete that.
Click image for full version.
3. Check the mail server ports
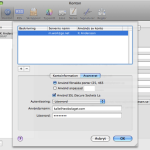 Outgoing server: Go to Advanced.
- Use port 465 (or 587).
- Use SSL.
- Fill in username and password again.
(Test your login details by signing in to your account on work2go.net)
Click OK.
Click image for full version.
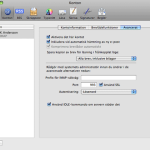 Incoming server: Go to Advanced on top of the page.
- Port: 993
- Use SSL.
- Fill in username and password again.
- (Test your login details by signing in to your account on work2go.net)
Click image for full version.
Can’t send e-mail in ZD Work2Go Mail
Can’t send e–mail from your computer? Go through the steps below to check the settings.
- Do you have the correct username and password?
Test them by logging in to your Work2Go in a browser: work2go.net
- Your account is not full already, is it?
Hold your cursor over your name in the upper right corner of Work2Go to see your account size. - Open ZD Work2Go Mail and go through all the settings for the account and re-enter the password. Check the box for Username and password required to send mail.
If the above did not help, contact our support.
Can’t send e-mail in Thunderbird
Can’t send e–mail from your computer? Go through the following steps to check the settings and if that does not help, try another security type and port.
- Do you have the correct username and password?
Test them by logging in to your Work2Go in a browser: https://www.work2go.net/
- Your account is not full already, is it?
Hold your cursor over your name in the upper right corner of Work2Go to see your account size.
- Open Thunderbird and go through all the settings for the account and re-enter the password.
- Change to no SSL and port 2525.
Fonts supported in Work2Go
When you want to use special fonts, it is important to remember that if the recipient does not have the same font on their computer, they may read the text of one of the fonts available on their computer instead. If you want to use a more unusual font we recommend that you make it into a PDF instead.
Share your calendar with your colleagues
Learn how and why you should share your calendar.
Share your Calendar is useful when you want others to know your schedule. When sharing a Calendar, a copy of the original is placed in the other user’s left column and therefor one will not need to log in to the other person’s account to view it’s content.
1. Right-click the calendar > Share this calendar.
2. The “Partition Properties” opens.
3. Select with who you want to share the calendar:
Internal users or groups
The user or group must have a valid email address in Work2Go. Assign them one of the following roles:
- None: An option you use to temporarily disable access to a shared Calendar without canceling the sharing. The Calendar will still remain in the other person’s account, but they won’t be able to view its content.
- Viewer: can read the content, but can’t make any changes to it.
- Manager: has full permission to read and edit the content.
- Admin: has full permissions to read, edit, add, delete, accept or decline invitations and administrate its content.
External guests
They can only read the content of the Calendar, but can’t make any changes to it. Enter the email address of your guest and set a password.
Public
They can only read the content of the Calendar and don’t need a password for it. Hand out the URL that appears in the box below. Right-click it and select ”Copy link” to get hold of the full URL. Anyone who knows about the URL to this Calendar will be able to see its content. No one can however make any changes to it.
4. To allow users to view your private appointments, tick the box.
5. Select the type of message to be sent out to those you want to share your folder.
6. When you are finished click OK.
NOTE: Keep in mind that if you have chosen Public, you will need to notify about the URL.
Mark an appointment with a tag
Learn how and why to use tags in your calendar.
With the help of tags, you can categorize your calendar entries and appointments.
This may be useful if you are working on different projects at once and easily want to distinguish them in the calendar.
- Create calendar post.
- Right-click the entry in the calendar > Marking meeting > New tag or select an already created tag.
Create a contact group if you frequently send e-mails to the same people at the same time
Do you often send e-mail to the same group of people? Then it can be useful to create a contact group for this.
With a contact group, it is enough to write the name of the group when sending a message to all members. Just like a distribution list, even though you don’t need to have administrator rights to create it.
- Click the arrow next to New contact > select Contact group.
- Give them a group name and select which address book to save it by Location.
- Add contacts to include in the group.
- Search for names using the search function.
- Select those to be included in the Contact Group. Multiple selection with Ctrl key.
- You can also enter email addresses in the box below. If there are multiple separate the addresses with a comma (,).
- Click Add or Add all > Save at the top left of the toolbar.
NOTE! E–mail addresses that are added to a contact group will only be saved in your contact group, not as a separate contact in any address book. A contact group is simply a list of addresses.
Show the Content
Do you already have a lot of contacts in an address book and want to avoid searching for them?
- Open the address book and select the contacts you want to add to a group.
- Right-click the selected contacts > New e-mail message.
- Now all contacts in a long row in the To field.
- Copy and paste them in the box titled “Or enter addresses below” > Add.
Show the Content
- Start by exporting a list from the address book.
- Preferences tab > Import / Export > Export.
- Type: Contacts
- Source: choose Address Book > OK > Export.
- Open the .csv file and copy the addresses.
- Go to your address in Work2Go and create a contact group.
- Add the addresses in the box at the bottom right “Or enter addresses below“.
- Add > Save.
Create a new e-mail message
Learn about the features you can use when creating new e-mails.
Click New message.
Who would you like to send from?
Who do you want to send?
![]() Please enter the e-mail address of the / those you want to write to in the To or Cc-field.
Please enter the e-mail address of the / those you want to write to in the To or Cc-field.
You can either type the address yourself or tap To to search through your address books. If the address is already saved in Work2Go you will get a list of hit results that match what you type and you won’t need to enter the entire address yourself but just choose the right one from the list.
If you want to send a blind copy to someone and do not see the field, click Show Bcc right of the Cc field.
Write the message and attach a file
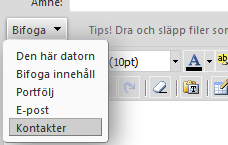 Click the arrow next to Attach to send one or more files. You can attach files saved in your computer or briefcase in Work2Go. If it’s an image, you can choose whether you want the image to be visible in the message itself or whether it should only be attached as a file. You can also attach another e-mail message from your mailbox or a contact from your address book.
Type your message and correct the formatting if needed.
Check spelling and other settings
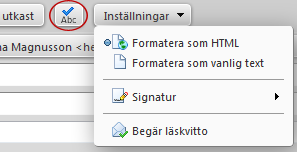 To check the spelling in the message, click the ABC button at the top.
To get a read receipt when the recipient opens your message, click the arrow at the top Options > Request read recipt.
To change the signature, click the arrow at the top Options > Signature.
Send now or later?
 If you don’t want to send the message immediately you can save it and send it at a later time, click Save draft.
To schedule when it should be sent instead, click the arrow at the Send > Send later and the message will automatically be sent along the time you specify.
Do you want to send your e-mail now, just click Send.
5 to consider before you send
- Read through the message before you send it.
- If anything needs fixing, specify what in the subject line.
- Write short and concise.
- Include people who need to be informed on the Cc line.
- Include people who you need to respond to or act on the To line.
Make Work2Go to default e-mail program
How to set Work2Go to opened when you want to send e-mail from a web site or application.
Set default e-mail program in Firefox
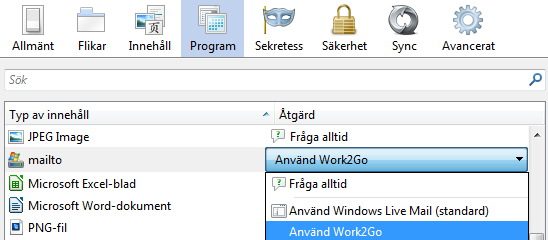
 1. Click the menu in the top right corner > Settings.
2. Go to the Programs and scroll the list until you come to mailto.
3. Click the arrow and select Use Work2Go > OK.
Print a message
- Select the message you want to print.
- Click Actions on the toolbar > Print.
- The printable message will be open in a separate window in your browser.
The print has too small / large font size
If you want to change the font size of something you want to print from Work2Go you can increase or decrease it. Go to the Preferences tab > General > Other.


